The ONLY Basketball Shooting Drills Resource You EVER Need! Here's Why
This is one of the best resources for shooting drills out there...
It's perfect for almost any level of player. And it's great for coaches and trainers looking to develop better drills and workouts!
Here's why...
This page includes a rare combination of...
- Using NBA analytics so you can pick the best shooting drills and eliminate all of the fluff
- Utilizing cutting edge research for categorizing and selecting the best type of shooting drills to ensure rapid improvement (random practice, variable practice, block practice, contextual interference, and more)
- Combining NBA analytics with a deadly mental approach that makes decision-making super easy while making you nearly impossible to stop
- Simple page navigation, so you can easily progress through your shot development by simply following down the page in order
- Taking your understanding of the game to the next level by showing you how to create the best shooting drills for your situation
- Structuring drills into categories so you can easily develop your own workouts.
(Hint: You can just pick a few from each category and develop a pro-level workout! Beginners might spend most of their time on the first few categories while advanced players spend most of their time on the latter categories.)
While we have a ton of great shooting drills and videos on this page if you're just looking for different drills...
This is much more.
It's a guide to help you develop into a lights outs shooter!
Let's get to it...
First, here are the categories, so you can quickly and easily navigate to different areas of the page.
- Individual Drills - 3 Highly Effective Shooting Drill Methods to Practice By Yourself
- Form Shooting Drills - 7 Drills That Build the Foundation for Every Elite Shooter
- Partner & Quick Release Drills - 5 Partner Shooting Drills for a Quick Release - Beginner to Advanced Progressions
- Dynamic Form Drills - Shooting Drills For Better Balance, Rhythm, and Shooting Range
- Vital Shooting Data - NBA Analytics to Develop the Best Shooting Drills
- Drills with Game-Like Cuts - Shooting Drills Modeled Off of the Most Effective Shots
- BDT Drills - 5 Basketball Decision Training Drills For Guards and Post Players
- 1v1 and 1v2 Drills - Shooting Drills Vs. Defenders That Also Develop Your Dribbling & Basketball Moves
Individual Shooting Drills
While we highly encourage to find partners to train with. Here are some tips if you are solo. That way, you can adapt most of the drills below to do by yourself.
And it's actually quite simple.
You can practice every game-like cut by simply doing two things.
1 - Use spin outs.
2 - Use chairs.
Individual Drill #1 - Spin Outs
You simply spin the ball out away from you backspin. Then you sprint to the ball and grab it, turn and face the basket, then shoot.
You can do a variety of straight cuts and curl cuts. You can do corner to wing cuts, wing to top cuts, post to perimeter cuts, perimeter to post cuts, high post to low post cuts, low post to high post cuts, fast break cuts from half court, and so on.
Individual Drill #2 - Chair with a Ball
Chairs are great for when you need to practice more complex cuts like V-cuts, L-cuts, shallow cuts, fade cuts, face cuts, curl cuts, etc.. It's harder to utilize spin outs when practicing these cuts.
Individual Drill #3 - Chair with a Helper
Also, if you can't find another basketball player to train with, you can have somebody else help. It can be a parent, sibling, friend, guardian, or anybody else. They just have to know how to rebound the ball and place it on the chair.
You also don't have to waste your time rebounding. You can get two basketballs and go at a quick pace. This is great for being efficient with your time and it also helps with conditioning.
Besides the 1v1, 2v2, and 3v3 drills, you can accomplish many of the drills below with this advice.
To get FREE 5 Shooting Drills To Make More 3's, click the banner below
7 Form Shooting Drills
These shooting drills are great for youth, middle school, and high school players. Even college and professional players use them!
However, the objective and the amount of time spent on these form shooting drills will be slightly different.
Obviously, one major benefit is that it improves shooting technique!
Developing proper shooting form is vital to being a great shooter!
Proper technique allows you to shoot the ball straight more consistently. This reduces your misses to the left and to the right. That alone means you will make more shots.
Proper shooting form also means that you're going to develop proper arc (45 to 50 degrees).
If you shoot with a flat 35 degree arc, that means you only have 0.6 inches of margin to miss the rim. If you shoot with an optimal 45 degree arc, that means you have 3 inches of margin to miss the rim.
That's a 500% increase for margin of error!
Additionally, when you shoot thousands and thousands of shots with proper technique, it gets ingrained into your subconscious. That means you don't have to think while shooting.
During the games, this means your mind is free to make better decisions on the floor!
How Much Time Should You Spend on Form Shooting?
Beginners might spend 15 to 30 minutes on these drills to develop proper shooting technique.
While players with proper shooting technique (and even pros) might do these drills for a few different reasons.
1 - Keep your shooting form polished, so no bad habits accidentally creep in.
2 - Develop a routine that helps prepare you mentally for practice or games. It also builds confidence as you see yourself making a bunch of shots.
However, a big difference is that a pro might only spend 3 to 5 minutes at the beginning of a workout or practice.
These drills won't take you through a full analysis of shooting form. For that, check out this article and videos: How To Develop Into A Great Shooter
Form Shooting Drill #1: One Hand Form Shooting
One hand form shooting is vital for developing a better release.
This is vital for teaching hand placement, feet placement, coordination between the wrist and the arm, pushing through the ball with your fingers, and proper angle of the release. You can change your focus as you progress through the drill.
Drill Instructions:
Stand 2 to 4 feet in front of the rim.
Position your feet properly and line up to shoot.
Bring your arm up into an L position. Your upper arm is parallel to the ground and your forearm is pointing to the ceiling. Your upper arm and forearm are at about a 75 to 90 degree angle.
Shoot 5 to 10 reps then move to a new spot.
Training Tips:
- Take the proper amount of shots based on skill level
- Shoot against wall, so you only worry about proper technique
- Advanced players can use side of backboard
Advanced players may only take a few shots. While players developing their form, may take up to 50 shots.
Also players, first learning new form can shoot against a wall. In fact, we highly advise this. You don't want to get discouraged by missed shots when you shoot at a basket. You just want to focus on proper technique. And doing that against a wall removes the hurdle of worrying about your misses.
Advanced players can also shoot on the side of a backboard. This provides an additional challenge with a smaller target. You have to shoot the ball straight. Otherwise, the ball doesn't come back to you.
Shooting Form Tips:
When trying to develop better shooting form, here are some things to focus on below. At first, you should also bring a checklist of these things to your workout.
You don't need to rush through these tips either! You can change your focus week to week as you master each aspect of your shooting form.
In fact, if you try to focus on everything, you can end up frustrated and even develop a robotic shot.
- Just relax and focus on a few things each week.
For the first week, just focus on hand placement and feet placement.
Once you've mastered that, focus on pushing through the ball with your fingers and developing proper backspin.
Once you've mastered that, focus on finishing your elbow above your eye, so you develop proper arc.
Depending on your age and skill level, you might spend months on each progression or just a few days. If you're a youth player, this can take years of practice. Everybody learns at different rates, so don't be frustrated if it takes you awhile.
Many NBA shooting coaches will spend an entire month working on an NBA player's shooting form before even advancing past 10 to 15 feet! So be patient and do things right.
In high school, Steph Curry spent almost a month shooting inside the free throw line.
If you take your time and focus on doing this the right way, you will be ahead of everybody else.
Most players rush the process and have to come back and fix their form years later. This puts them way behind where they should have been! Instead of working on more advanced skills, they're back working on shooting form.
Here are some shooting technique tips...
- Hand placement - Index finger near middle of ball
- Feet placement - Slightly staggered or slightly turned
- Pushing through the ball with your fingers - Index finger or index/middle combo.
- Coordination between wrist and arm
- Proper angle of the release - Elbow above the eye
Make sure hand placement is consistent on every shot. You want your index near the middle of the basketball. You can use the air hole as a reference point.
You also want your fingers spread comfortably with your thumb on the side of the ball.
You want to develop consistent footwork to develop consistent shooting. We prefer to slightly stagger your feet or slightly turn your feet.
For a staggered stance with right handed shooters, your right foot would be a few inches in front of your left foot. If you're a left handed shooter, your left foot would be a few inches in front of your right foot.
To slightly turn your feet, you take your lead foot and turn it from 5 to 20 degrees from the center of the rim. Right handed shooters would slightly turn their feet to the left. Left handed shooters would slightly turn their feet to the right.
These stances help position your lower body, so your upper body aligns properly to shoot the ball straight. By slightly turning your shoulders, it allows you to get your palm facing the basket on the follow through. It also reduces tension in your upper body and shoulder area.
Each player's body composition is different. Each player's movement patterns are different.
Some can use a completely squared stance and accomplish proper shooting form. Some have to exaggerate the turning of their body and feet.
Here's an example of a checklist for stance and hand position:
1 - Feet hips width apart.
2 - Same stance whether slightly staggered or slightly turned.
3 - Index finger near the middle of the ball.
4 - Fingers comfortably spread
5 - Ball on the side of your thumb.
If you're first learning to shoot, I prefer to focus on the index finger. However, many great shooters have focused on pushing through the index finger and middle finger at the same time. Figure out what works best for you.
This drill also helps develop coordination between extending your arm towards the basket and bending your hand forward. Some call this snapping your wrist, but we don't want to encourage an aggressive snap forward. So we always encourage a relaxed wrist on the follow through.
To develop a proper arc of 45 to 50 degrees, you need to release the ball at this angle. Since it's hard to figure this out by yourself, an easy reference is to get your elbow above your eye on the follow through.
Form Shooting Drill #2: Add Guide Hand
This shooting progression is vital for practicing good habits with your guide hand. These good habits lead to shooting the ball straight and making more shots.
If you have too much movement with your guide hand, this can change the flight of the ball. It can cause the ball to move right or left.
Drill Instructions:
Stand 2 to 4 feet in front of the rim.
Position your feet properly and line up to shoot.
Bring your arm up into an L position. Your upper arm is parallel to the ground and your forearm is pointing to the ceiling. Your upper arm and forearm are at about a 75 to 90 degree angle.
Place your guide hand on the ball.
Shoot 5 to 10 reps then move to a new spot.
Advanced players may only take a few shots. While players developing their form, may take up to 50 shots.
Once again, beginners can shoot against the wall. Advanced players can practice against the side of the backboard.
Training Tips for the Guide Hand:
- Four fingers pointing to ceiling
- Making a T with thumbs
- Freeze guide hand
When placing your hand on the ball, you want four fingers pointing straight up to the ceiling.
If your hands are properly positioned on the ball. The thumb on your shooting hand will be pointing at the thumb on your guide hand. For some players, this forms a T.
When you release the ball, you want to freeze the guide hand. You don't want your guide hand to push the ball.
Form Shooting Drill #3: Start at Shoulder
This is another great progression as you work towards developing proper form for the full shooting motion. A very overlooked aspect of this progression is that it actually teaches proper coordination between the lower and upper body.
If you study great shooters, you will notice this among them. As they bring the ball up, they don't start to extend their legs until the ball reaches their shoulder or face area.
So depending on the shooter and the location of the pass, many times the ball will start going up prior to the legs starting to extend. This helps develop that proper rhythm and coordination!
Drill Instructions:
Stand 2 to 4 feet in front of the rim.
Position your feet properly and line up to shoot.
Place the ball in front of your shoulder with legs slightly bent and ready to shoot.
Shoot 5 to 10 reps then move to a new spot.
Advanced players may only take a few shots. While players developing their form, may take up to 50 shots.
Once again, beginners can shoot against the wall. Advanced players can practice against the side of the backboard.
Training Tips:
- Fluid motion
You want your shot to be fluid and smooth throughout the whole shooting motion. Even though you're breaking down different parts of the shot with these form shooting drills, you don't want any glitches or pauses in the shot motion.
Form Shooting Drill #4: Waist to Shoulder
This builds on the previous form shooting drill where it focuses on proper coordination, rhythm, and timing between your upper and lower body.
In this drill, you focus on bringing the ball up prior to extending your legs. This ingrains that habit
Drill Instructions:
For this progression, you can stand anywhere. You don't need a wall or basket.
Position your feet properly and line up to shoot.
Move the ball up from your waist to in front of your shoulder.
Do this 5 to 10 times.
Training Tips:
- Keep legs bent
- Start slow - Don't rush
When bringing the ball up from your waist to your shoulder or face area, you want to keep your legs bent in a quarter squat position. You don't want to extend your legs.
Also, there is no need to rush, you can start slow and slowly speed up the motion as you get accustomed to it.
Form Shooting Drill #5: One Motion
This is the final piece for the full shooting motion. This puts everything together with the proper habits you've been practicing before.
Drill Instructions:
Stand 2 to 4 feet in front of the rim.
Position your feet properly and line up to shoot.
Start with the ball around your waist in a Tuck position.
Shoot 5 to 10 reps then move to a new spot.
Advanced players may only take a few shots. While players developing their form, may take up to 50 shots.
Beginners can use a wall to focus on proper technique.
Training Tips:
- Fluid motion
- Elbow tucked - Up and out
Once again, you want to shoot the ball in a fluid motion with no glitches or pauses.
Make sure the elbow is tucked. Then immediately go up with your shot motion. As the ball reaches your face, you start to extend your release up and out towards the basket.
You don't want to start with the ball too far in front of you. If your elbow isn't tucked, this can happen. As a result, you bring the ball backwards prior to releasing. This can create a slingshot type shot where you bring the ball beside or even behind our head.
To fix this, have something in front of you that prevents you from pushing the ball too far forward. You have to go up then out. You can even have somebody place their hand there. This works great as it also forces you to feel what is correct and what is wrong.
If this doesn't fix the problem, have someone positioned behind you. Then put their hand or another object beside your head. If you hit it, you will know you're bringing the ball too far back.
Form Shooting Drill #6: Ball Pick Ups - Shooting off the Dribble
This is a vital shooting drill for learning how to properly shoot off the dribble. It reinforces good habits of bringing the ball into your shooting hand. By doing this, it helps develop consistency where your shooting release is coming from the same spot on every shot.
It also teaches you how to go into your shot motion with fluidity off the dribble.
Drill Instructions:
Stand 2 to 4 feet in front of the rim.
Position your feet properly and line up to shoot.
Dribble the ball then move the ball over to your shooting hand.
You want to practice dribbling with your shooting hand and opposite hand. You can even practice stationary dribble moves prior to the shot.
Shoot 5 to 10 reps then move to a new spot.
Advanced players may only take a few shots. While players developing their form, may take up to 50 shots.
Training Tips:
- Snap the ball over
- Stab your feet
When dribbling, snap the ball over to your shooting hand as quickly as possible. This will speed up the shooting process and develop a quicker release off the dribble.
To develop plyometric effect with your feet, you can stab your feet as you're snapping the ball over. This can help you develop more rhythm and power with your shot.
Form Shooting Drill #7: Bank Shots
This is a great drill for developing a touch off the glass, so you can use bank shots during the game. Being able to use the backboard helps with touch, so you can make more shots. And other times, you want to use the backboard, so you can avoid a blocked shot.
Drill Instructions:
Start at about a 45 degree angle to the basket. You can start 2 to 4 feet from the basket.
Position your feet properly and line up to shoot.
Start with the ball above your shoulders and shoot off the backboard.
You can shoot 10 shots while alternating to both sides of the basket.
Training Tips:
- Ball coming down
- High hands
You want the ball to be coming down when it hits the backboard. If you hit the backboard on the way up, the ball will bounce past the rim.
You want to start with the ball above your shoulders and shoot from that position. That way, if you catch the ball in the paint, you can go immediately into your shot. This will help you shoot before shot blockers can rotate over. Additionally, it keeps the ball up away from defenders trying to swipe at the ball.
General Shooting Form Drill Tips:
- Quality reps over quantity
- Relax, don't be tense.
With all of these drills, you want to emphasize quality over quantity. It's better to shoot 10 shots with proper shooting technique than 100 with poor to average technique.
You can also slow down at first then slowly speed up the shooting motion.
On the first day with the new technique, you might only do 25 to 50 shots. However, by the fourth or fifth day, you might be able to get 100 to 200 shots in that same amount of time.
Sometimes, when you're focusing on certain aspects of your shooting technique, you can start to tense your muscles up. If you feel yourself doing this, just take a deep breath, blow out your breath, and relax. You want to be relaxed throughout your shooting motion. Too much tension kills a shooter's touch.
Fun (or Competitive) Form Shooting Drills:
Here are some other variations you can do when practicing your shooting form drills as well.
These variations improve focus and ensure that you don't move back too quickly. That way, you don't resort back to poor shooting technique.
- Make 8 out of 10 then move back.
- Make 3 in a row then move back.
You start 2 to 4 feet from the basket. If you make 8 out of 10 shots, you move back 2 to 3 feet. If you do not make 8 out of 10 shots, you stay at the same spot.
Younger players might do 7 out of 10.
You start 2 to 4 feet from the basket. If you make 3 in a row, you move back 2 to 3 feet.
You can give yourself one to three chances at each line. You can vary this based on your age level and skill level.
5 Partner Shooting Drills for a Quick Release - Beginner to Advanced Progressions
These shooting drill progressions will speed up the development of your shot and correlate to better shooting during games.
These shooting drills are middle school, high school, college, and professional players. However, younger players can start to use these drills as they master their shooting form.
These shooting drill progressions will speed up the development of your shot and correlate to better shooting during games. You can use these progressions as a template for improving other skills as well.
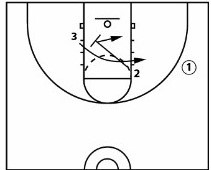
Partner Shooting Drill #1 - Quick Release
Here we will learn how to isolate the shooting skill and get a bunch of reps in a short amount of time. This is important when we are first practicing a skill or learning a new skill. You will see pro players do the same thing to develop rhythm and confidence prior to working out or playing a game.
In this particular drill, you're focusing on developing a quicker shot release.
Drill Instructions
One player starts at the free throw line in a shooting position.
Player 2 begins with the ball at the baseline.
Player 2 makes the pass to the player 1 at the free throw line.
To get both players involved, you follow your shot and the passer (Player 2) runs to the free throw line to take the next shot.
The pattern continues.
Training Tips:
- Create Target with Hands - Your hands should create a target for the passer. This helps with better passes and helps speed up the shot.
Feet Aligned - You want your feet aligned to the basket. You should act as if you already have the ball in your hands so you are ready to quickly shoot the ball.
Legs Loaded - Legs are loaded so when you catch the ball, you are ready to immediately shoot the ball.
Partner Shooting Drill #2 - Change Spots
In the next progression, you add a little variability to the drill by having the shooter move to a new spot after each spot. At first this may cause you to shoot a lower percentage, however, it does speed up the learning and ability to retain the new skill, which will lead to better shooting in the long run.
Drill Instructions
This is very similar to the last drill. The only difference is that you change the position on each shot.
One player starts at any spot on the floor.
Player 2 begins with the ball at the baseline.
Player 2 makes the pass to the player 1. Player 1 immediately shoots.
To get both players involved, you follow your shot and the passer (Player 2) runs to the free throw line to take the next shot.
The pattern continues.
Training Tips:
Spin Outs for Shooting Alone - If you don't have a partner, you can do this by spinning the ball to yourself, catching and shooting.
Change Distance - In addition to changing the angle, you can also vary the distance of your shot each time. This is another way to challenge yourself and get better at shooting during games where the shot distance and location often varies on each repetition.
Partner Shooting Drill #3 - Soft & Hard Close Outs with Defense
The next progression gets you accustomed to shooting with a defender closing out. This is vital if you want to be a better shooter during games. You have to get better at shooting with a defender in close proximity. You also have to get better at making the choice at attacking the basket if the defender is too close.
Drill Instructions
The defense closes out hard or closes out soft. You work one option for multiple reps before moving to the next one.
The rotation is the same as the previous drills.
Player 2 begins with the ball at the baseline.
Player 2 makes the pass to player 1. Player 1 immediately shoots.
To get both players involved, you follow your shot and the passer (Player 2) runs to the free throw line to take the next shot.
The pattern continues.
Against a soft close out:
A soft close out is typically more than an arm's length away or the defender's hands are down.
Against a soft close out, you catch and shoot.
Against a hard close out:
A hard close out is typically an arm's length away with the defender's hands up to contest or block the shot.
Against a hard close out, you immediately attack the basket.
Training Tips:
Attack Immediately - No Hesitation - The most important thing here is for the shooter to be assertive and aggressive. With time and repetition, your decision making will get better and will lead to more scoring.
We believe it's better to make the wrong choice and attack immediately.... than it is to make the correct choice and attack tentatively and at a slower pace.
Partner Shooting Drill #4 - Defense Dictates Soft & Hard Close Outs
In the next progression, you can have the defender mix up the looks between a soft close out and a hard close out. The offensive player will not know ahead of time whether it is a hard or soft close out.
This is a great drill for getting you used to game situations, and getting you used to attacking the defense.
It's the same set up and pattern as the previous three drill progressions. Passer passes to the shooter and closes out. Shooter shoots then gets the rebound and becomes passer.
Partner Shooting Drill #5 - 1v1 Close Outs to 3v3 Close Outs
Lastly, you can have the players start in the same positions, but then play live once the ball is passed.
You can play mini games to 2 or 3 points. Shooting against a live defense adds a layer to your practice and also leads to improved performance during games.
You can take this same 1-on-1 drill and add two offensive players and two defensive players to make it a 3-on-3 game. This will help players learn to pass, shoot and space within a game context.
5 Dynamic Form Shooting Drills - For Better Shooting Range, Rhythm, Coordination, and Balance
Typically, these drills are for advanced youth players, high school players, college, and professional players. However, advanced youth players could do these drills too. The most important thing is to have mastered your shooting technique prior to starting these drills.
As you know, excessive upper torso twists and excessive fading during the shooting motion can damage your shooting percentage.
One of the keys to great shooting is...
The ability to transition to a stable, balanced position as quickly as possible! Your ability to reduce excessive twists and fading prior to shooting the ball results in a higher shooting percentage.
Coach Chris Oliver has a unique form shooting routine that is perfect for this. It improves your shooting through better balance and stability!
During practices and pre-game preparation, you will notice that players like Steph Curry, Kevin Durant, Jimmy Butler, and Dirk Nowitzki use many of the same drills.
These players are tremendously skilled at transitioning from unstable positions to a stable position at the end of their shooting motion. These drills are a big reason why!
These drills and exercises also improve your strength and power throughout your entire body or kinetic chain. This better strength, power, balance, and stability leads to... higher & quicker jumping, faster running, quicker changes of direction, better playing through contact, and so on!
Improved coordination and strength can also lead to an improved shooting range!
These are 5 of the 15 dynamic form shooting drills that Coach Chris Oliver uses.
Dynamic Form Shooting Drill #1 - One-Foot Reaches
This practices lifting the ball up through the shooting motion. This improves shoulder extension and high follow-through. It also increases core stability to improve balance at the top of your shot.
Drill Instructions:
To perform a one-foot reach, balance on one foot while extending the ball forward with both hands. Keep the back leg straight in line with your back and with the back toe pointed down.
After reaching forward, return to an upright position in Position 2 while continuing to balance on one foot. Finish the shot by releasing the ball from Position 3.
Dynamic Form Shooting Drill #2 - One-Foot Squats
The difference between the squat and the reach is where to position the body relative to your center of gravity. Both drills are as much about balance and stability as they are about shooting. In this case, we are targeting the ankle specifically to improve strength, balance, and stability.
This movement improves stabilization of the core, the lifting of the ball from Position 2 to Position 3, and the high follow through as you sign your shot.
Drill Instructions:
When using the one-foot squat you should bend at the butt - meaning your hips will lower toward the ground as your knee bends.
When performing the reach - your hips stay in the same plane as you reach forward with the ball while extending your back foot. Your hips will remain at a consistent distance from the floor during the reach, but will lower toward the ground during the squat.
Dynamic Form Shooting Drill #3 - Touch the Ball to the Ground
In this drill, we transition to using both hands, and shoot off of two feet. This form shooting drill works on the concept of bending and extending to flow into your regular shot with no pause during the movement.
This drill is particularly useful for players that have a tendency to fall forward, to the side, or backward after they shoot. The movement in this drill focuses on rising with balance and going straight up and straight down with their shot. This works if you flow from your largest muscles to the smallest muscles as you lift the ball from the ground to your release.
Drill Instructions:
The initial movement is similar to a baseball catcher dropping into a stance. Lower the ball to touch the ground between your feet then rise up in one motion into your normal shot. You can leave your feet to shoot, and should shoot your regular shot.
Again, the squat requires bending at the butt so that the hips lower toward the ground. We want to avoid bending at the waist. The head should not get outside of your center of gravity. Bending at the back often leads to a push shot rather than lifting the ball from Position 1 to Position 2 to Position 3.
These shots are demonstrated close to the basket, but you can progress all the way out to the 3-point line.
Dynamic Form Shooting Drill #4 - One-Foot Jumps
Combined with the one-foot jumps, this drill develops core stabilization as the ball is transferred from Position 1 to Position 2 to Position 3.
Another advantage of the one-foot side jump is that you must fight for your feet prior to the shot. This movement works on the action-reaction of getting your feet to the ground so that you can quickly get into your shot.
Drill Instructions:
One-Foot Side Jumps - This movement begins with a lateral jump from one foot to the other. The shooter lands by balancing on the plant foot to create stability.
Random One-Foot Jumps - Once players become comfortable with one-foot side jumps we want to make their movements more random by adding different jumps in different directions such as
- Forward to Back
- Side to Middle
- Back to Front
Players are not limited to right angles. In fact, we encourage them to use many different angles to increase the variability in their workouts.
This is like a plyometric workout in that it is similar to jump training. As quickly as the landing leg finds the ground, we want to push back to a different spot on the floor. This simulates moving in a basketball game without the ball prior to catching and shooting a shot.
One of our key teaching points is that "You don't shoot quickly, you prepare to shoot quickly." The process of using the plyometric step and jumping back to the spot should be done as quickly as possible. However, you should not rush the natural rhythm of your shot as you progress from Position 2 to Position 3. That rhythm should remain natural and flow the same every time so that every shot is consistent.
Dynamic Form Shooting Drill #5 - 360 Degree Dance Step
This works on fighting for your feet out of an exaggerated pivot action. This builds on the concept that your feet are the first thing that matters when it comes to shooting.
Drill Instructions
To execute this maneuver, pivot all the way around in a full 360 while balancing on one foot. Upon returning to a square position with the rim, drive the swing foot to the ground to regain stabilization.
It's important to focus on getting your feet set on the ground prior to shooting. That doesn't necessarily mean that your feet have to be squared to the backboard, it simply means that balance must be produced in the action-reaction of getting your feet to the ground.
Dynamic Form Shooting with BDT
A final layer that can be added to form shooting workouts is to incorporate the signals from BDT (Basketball Decision Training - referenced in more detail below). This requires you to work on footwork, shooting, and decision-making in response to your partner's decision cues.
In our initial example, we utilize just two signals:
- Hands Up > Pass
- Hands Down > Shoot
These are just a few of the form shooting progressions that Coach Oliver uses. You can find 15 form shooting drills in his development videos on Basketball Decision Training.
Important NBA Shooting Data That Will Change the Way You Practice!
You absolutely must read this section before practicing more shooting drills. Why?
Without changing your form or even practicing one more second... this can dramatically improve your shooting percentage!
If you want to become a great shooter, you must practice shooting drills that...
Happens Most During Games
This might seem like a no-brainer. But if you dive into the analytics, some things might surprise you.
According to NBA.com, during the 2018-19 season, here is how many dribbles were taken after the player catches the ball prior to shooting.
0 Dribbles - 44.1% of shots
1 Dribble - 13.1% of shots
2 Dribbles - 12.1% of shots
3 Dribbles - 4.9% of shots *
4 Dribbles - 4.9% of shots *
5 Dribbles - 4.9% of shots *
6 Dribbles - 4.9% of shots *
Rest - 11.1% of shots
* Note: For 3 to 6 dribbles, we couldn't get an exact percentage. The stats were lumped together in one category. The total came to 19.4%. Hence, the 4.9% (rounded) for each amount of dribbles.
70% of your shots come with two or fewer dribbles.
It also appears that you should spend almost half of your time on situations where you immediately shoot off the catch and don't even dribble the ball!
And here's another interesting layer to this approach...
Focus on What Works... Like High Percentage Shots!
Here are some additional analytics from NBA.com for the 2018-19 season.
This is how many points they scored per shot based on the number of dribbles they took.
0 Dribbles - 1.16 Points Per Shot
1 Dribble - 1.02 Points Per Shot
2 Dribbles - 0.95 Points Per Shot
3-6 Dribbles - 0.94 Points Per Shot
7+ Dribbles - 0.93 Points Per Shot
Think about that...
Not only do shots with fewer dribbles (about 2 or less) tend to happen more often during games...
They are also more effective!
But you also need to make sure to read this next section...
Otherwise, you might actually shoot worse!
A Vital Mental Approach for Games so Your Smart Practice Doesn't Go to Waste!
Does this mean you should shoot more off the catch even if it's contested!?
Unless you're within six feet of the basket... Absolutely not! That was a big misconception with the data above.
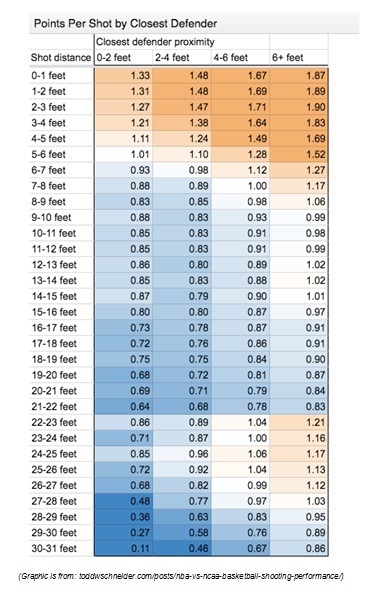
Look at the following chart quick based on NBA data then read below...
Based on the data above, here's what we think you should do...
Shoot the Ball When You're Open!
If you can make the shot consistently and you're open, shoot it! That's what Don Kelbick told me over a decade ago...
Then Don told me, "You are most open when you first catch the ball."
That's definitely why you see a high percentage of shots being taken with no dribbles. And they also have the highest points per shot.
Of course, you still need to keep time and score in mind. You don't want to launch up a shot when you're up 3 points with 7 seconds left.
(On a side note, when Don first presented these Attack & Counter concepts in our newsletter over a decade ago, a lot of coaches blasted us with criticism. It's slowly waned over time. And the criticism took a deep dive when Jay Wright of Villanova, who recently won a few national championships, said the same thing a year or two ago.)
However, focus on the key phrase there... "You're open"
Just because shooting off the catch delivers the higher point per shot, it doesn't mean you should force a shot up.
As the analytics show above... open shots are way more efficient than contested shots!
So it's better to take two dribbles to shoot an open shot versus shooting off the catch with a defender in your face.
With that being said, you also need to take a look at this next graphic that summarizes the data above.
It could drastically change your offensive approach if you're not open off the catch...
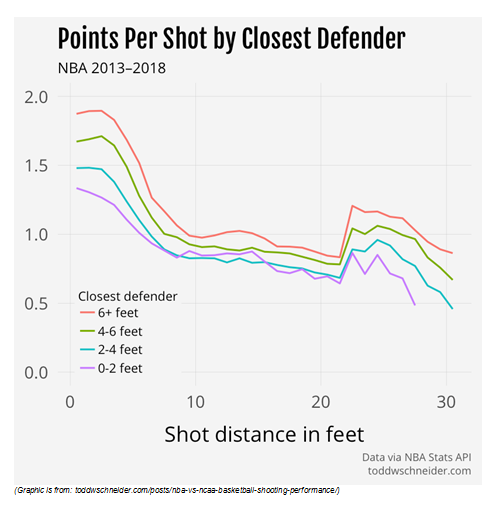
Look at that... Even shots that are heavily contested within 5 or 6 feet of the basket are still on par with wide open 3-point shots!
So that's why I'm a big believer in Don Kelbick's next concept...
If You're Not Open off the Catch, "Think Lay Up!"
As stated above...
When you first catch the ball, you're the most open. Hence, players taking this shot the most and also shooting with the most efficiency.
However, if you're not open, you should have an attack mentality and try to get to the basket.
As you get closer to the basket, you shoot a higher percentage.
As you can see, even heavily contested lay ups are still some of the most efficient shots in basketball!
Not to mention, defenses tend to foul more if you attack the basket. This leads to...
- More free throws which are highly efficient. Even a poor free throw shooter at 55% still equates to a solid 1.1 points per shot!
- The defense becoming more hesitant.
- Your opponent's best players sitting on the bench and not playing.
- If you enter the foul bonus, your efficiency at the end of games go up and you get more wins. That's because you're shooting more free throws than your opponent.
Now, of course, you don't want to blindly charge into a group of defenders sitting in the lane.
Then your points per shot will dramatically lower.
And...
Your turnovers and offensive fouls dramatically rise!
That's why you need to...
Have a third progression.
The Forbidden Third Shooting Progression!
So if you're not open off the catch.
And the defense makes it difficult to reach the basket...
A pull jump shot off the dribble is a great counter.
And this greatly simplifies your mental approach to the game! It's super simple and highly effective!
Now why did I call this the "Forbidden Third Shooting Progression"?
The mid range jump shot has gotten a bad rap over the last decade. Many coaches don't even want their players shooting it during games.
That's because the analytics above show that even open mid range jump shots aren't highly efficient.
You could make a legit argument that you shouldn't take shots from 16 feet to the 3-point line.
Now, that's another whole debate we don't want to address right now.
Even with that being said, we still highly advise you practice this third progression. Even the naysayers would have to agree...
1 - When you "Think Lay Up", you're naturally going to cover distance with your first dribble. This will put you in the range of 16 feet and closer where the points per shot trend higher.
And if you're not open, pass the ball!
2 - If the shot clock or game clock is winding down, the mid range shot off the dribble might be your best option for a shot.
Now should you practice the mid range jump shot off the catch?
Absolutely!
Here's why...
1 - You might not be ready to shoot 3-pointers yet. And shooting the mid range jump shot is the next progression as you extend your shooting range.
2 - Your points per shot from mid range might be really high! Each player is different and this might be a high quality shot for you.
That would be ludicrous to tell you to stop shooting this shot during games if you're highly efficient.
3 - As the initial data pointed out, with all things being equal, you tend to shoot better off the catch than shooting off the dribble.
0 Dribbles - 1.16 Points Per Shot
1 Dribble - 1.02 Points Per Shot
2 Dribbles - 0.95 Points Per Shot
3-6 Dribbles - 0.94 Points Per Shot
7+ Dribbles - 0.93 Points Per Shot
So if you're open, maybe the mid range shot off the catch is still a great shot for you.
So to Review the Mental Approach During Games Here...
1 - Think shot off the catch. If you're open, shoot it!
2 - If you're not open, think lay up!
3 - If the defense collapses, pull up for a jump shot!
This will lead to a higher shooting percentage. And possibly more importantly, it greatly simplifies your mental approach to the game!
Shooting Drills with Game-Like Cuts
When you have...
- Developed proper shooting technique.
- Understand NBA data that helps you focus on the best type of shots to practice.
- Learned a powerful mental approach that aligns with NBA analytics...
You're ready for the shooting drills to practice!
During Shooting Drills, You Must Do This Before Your Shot!
This might seem obvious to some, but it's very important...
Some sort of game-like cut, leads to many shooting opportunities that you get during the game.
And most of your shooting drills should include a game-like cut prior to shooting.
Now, what is a game-like cut?
To greatly simplify, your cuts can be...
- Towards the ball or away from the ball
- Towards the basket or away from the basket
- And some sort of combination of the two above.
If there are specific cuts that occur quite often within your offense, practice those as well. We highly advise that you ask your coaches too!
We have some examples below...
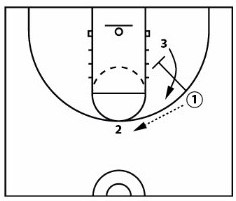
|
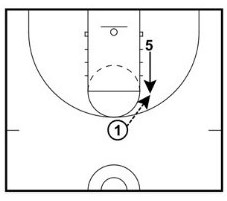
Down Screen - Curl Cut The cut is towards the ball and slightly away from the basket. |
|
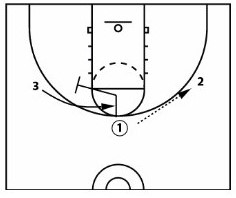
|
Away Screen - Straight Cut The cut is towards the ball. |
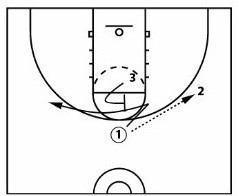
|
|
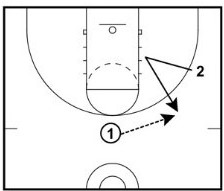
Flare Screen - Fade Cut The cut is away from the ball. |
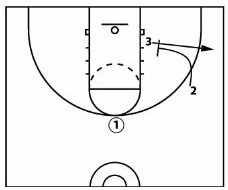
|
|
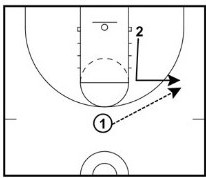
Corner Pin Screen - Straight Cut The cut is away from the basket and slightly away from the ball. |
|
|
Flash Cut This is a cut away from the basket and towards the ball. |
|
|
V Cut This is a cut away from the basket and towards the ball. |
|
|
Zippen Screen This is a cut away from the basket and slightly away from the ball. |
|
|
L-Cut This is a cut away from the basket and away from the ball. |
|
|
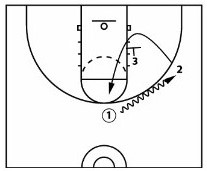
Post Down Screen This is a cut towards the ball and away from the basket. |
|
|
Back Cut This is a cut towards the basket and away from the ball. |
|
Of course, there are many more cuts and examples of this. This was just meant to get you an idea of the possibilities.
Also, make sure to still practice catch and shoot situations where you move very little!
There are times during games where you just stay in your spot, receive a pass, and shoot. Sometimes, the best option is to stay still.
This might happen when a teammate posts up or dribble penetrates. It can happen on a quick ball reversal.
How To Combine Analytics & Your Game-Like Shooting Drills To Shoot Lights Out!
Here is an easy way to structure your drills after considering the analytics and mental approach mentioned above.
This is a template that you can use...
- Game-Like Cut > Shot
- Game-Like Cut > Triple Threat Move > 1 Dribble > Finishing Move
- Game-Like Cut > Triple Threat Move > 1 Dribble > Pull Up Jump Shot
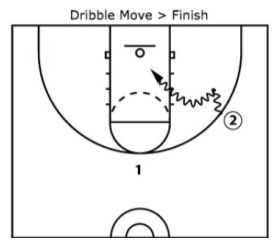
- Game-Like Cut > Triple Threat Move > 2 Dribbles (Dribble Move) > Finishing Move
- Game-Like Cut > Triple Threat Move > 2 Dribbles (Dribble Move) > Pull Up Jump Shot
Many youth and high school players would do great just by focusing on the first three progressions for 80% of their shots!
We took this exact approach with a player named Kyle Wolf who later became the 2013 Gatorade Player of the Year in Missouri.
Not too bad, considering he was sandwiched between the other winners of Bradley Beal, Jayson Tatum, and Michael Porter Jr.
This is a great video that quickly covers each of the five progressions. We cover each progression in more detail below.
Do not dismiss these drills because they look simple!
These are very important progressions that the top NBA players in the world practice every day.
As Michael Jordan's trainer, Tim Grover said,
-
"Great players aren't great because of the highlight plays that happen. They're great because they do the basics better than anybody else. And they work harder at the basic skills than anybody else. They become extraordinarily skilled at the ordinary things."
You must have the mentality that you're going to become the best at the simple things. And this is REALLY HARD to do! It's not easy. Very few players ever do this.
And if you focus on mastering the simple skills, I guarantee that you will take your game to another level.
Game-Like Cut Drill #1 - Corner to Wing > Shot
This covers one of the most common cuts in basketball... a perimeter cut to the ball. While it may start or originate slightly different, many shots originate with a cut towards the basketball.
Like we mentioned above, you want to practice what happens most in the game of basketball! And then become really good at it. And this is one of those things.
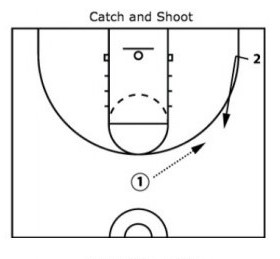
Drill Instructions:
Starting from the corner, you cut to the wing.
You turn as quickly as possible to face the basket. Ideally, you get into this position as you catch or grab the ball.
For footwork, you can use a hop or front pivot.
Then you immediately shoot the ball off the catch.
You get the rebound then immediately start your next repetition.
Training Tips:
Set up your cut
Practice different ways to set up your cut. Pretend that a defender is guarding you. You want to practice creating separation from the defender prior to cutting to the wing. If you can't create separation, you won't get nearly as many shots.
Ball in the air, feet in the air
Prior to catching or grabbing the ball, you already want to be transitioning to face the basket. Some coaches like to teach that your feet should be in the air prior to catching the ball. That way, you can stick your feet and start your shot motion at the exact same time.
Game-Like Cut Drill #2 - Corner to Wing > 1 Dribble > Finishing Move
This drill is a great counter for when the defender takes away your shot off the catch. Like mentioned before, your mentality should be to get to the rim.
As analytics already pointed out, if you can shoot off the catch and finish off the bounce effectively, you will be a very good player.
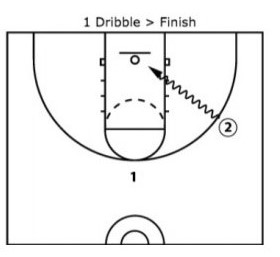
Drill Instructions:
Starting from the corner, you cut to the wing and catch the ball.
You turn and face the basket off the catch. You're ready to shoot.
Next, you take one dribble and shoot a lay up.
You get the rebound then immediately start your next repetition.
You can also alternate finishing moves on each lay up.
Training Tips:
-
Prepare to shoot off catch - Eyes on the rim
Your mentality is that you're going to shoot the ball off the catch. Footwork and preparation is all of the same.
You turn, get your eyes on the rim, and the ball ready to shoot. Then you attack off the dribble.
If you don't go full speed and pretend you're going to shoot, a couple of things can happen.
1 - Go too slow and don't put the defender at a disadvantage. They don't have to close out as fast to stop you from shooting.
2 - Since your preparation is different, a good defender can read that you're going to drive. Now, it's harder to create separation off the dribble and get to the rim.
Limit excessive shot fakes
You want to be ready to shoot. You want to get the ball in your shot pocket. However, we don't encourage big shot fakes where the ball goes above your head. We think this slows you down too much and allows the on ball defender and help defense to recover.
Think lay up
Once you start to attack, your next mentality is to think lay up. This puts you in the mentality to attack the rim. As a result, your body gets in an ideal position to explode towards the basket.
Long and low - but not too long
You want to imagine you're getting your shoulders by the defender's hips. That way, you're in a position to accelerate by the defender. However, you don't want to get too long. Overstriding can cause you to lose balance and slow down.
Straight line
You want to attack the basket in a straight line. This helps you get to the basket quicker.
Additionally, you want to get the defender on your back as quickly as possible. This makes it more difficult for them to recover and contest the shot.
Game-Like Cut Drill #3 - Corner to Wing > 1 Dribble > Jump Shot
Like mentioned above, the third counter is to pull up for a jump shot off the dribble. If you can make this shot at a high percentage, it will make you extremely difficult to guard.
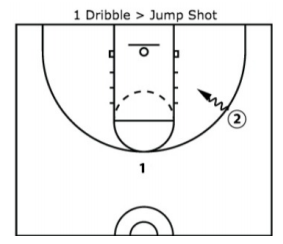
Drill Instructions:
Starting from the corner, you cut to the wing and catch the ball.
You pretend that you're going to shoot it.
Next, you take one dribble and attack the rim.
However, this time you pull up for a jump shot after one dribble.
You get the rebound then immediately start your next repetition.
Training Tips:
Still think lay up - Cover distance
Even though you pull up for a jump shot, you still need to think lay up. If you don't, you won't cover as much distance with the dribble. In order for this shot to be effective, you need to create separation from the defense.
And the closer you get to the basket, the higher your shooting percentage typically is.
Bring ball to shot pocket
As you pick up the ball, make sure to bring the ball to your shot pocket as quickly as possible. This helps you shoot quicker.
It also helps you have a direct line in your shooting motion which will lead to fewer misses to the left and right. And that means more made shots.
Game-Like Cut Drill #4 - Corner to Wing > Dribble Move > Finishing Move
When attacking the basket, sometimes the defense cuts you off. This can be a recovering on-ball defender or it can be the help defense. Either way, it's great to have a dribble move to change directions and blow by the defense.
Drill Instructions:
Starting from the corner, you cut to the wing and catch the ball.
You pretend that you're going to shoot it.
Next, you take one dribble, execute a dribble move, then attack the rim.
You get the rebound then immediately start your next repetition.
Training Tips:
-
Think shot and Think lay up!
All of these moves are set up by pulling the defender with you and staying one step ahead.
By thinking shot off the catch, it pulls the defender forward.
By thinking lay up, it pulls the defender with you.
And since they already closed out hard on the initial catch, they have to scramble even harder to recover and stop you off the dribble. This will make the defender lean even harder in that direction.
And if they do recover, this is a prime time to cross them up with a dribble move.
Snap the dribble
When you change directions, snap the dribble over. Even a defender leaning out of position can sometimes get a hand on the ball.
Snapping the ball quick and hard makes it difficult for the defender to get a hand on the ball.
Snapping the dribble also helps position your body quickly to go in the other direction.
Reposition feet
As you snap the dribble, you can also do a quick repositioning of your feet to head in the new direction. It's like a hop with minimal jump. Just enough height to quickly reposition your feet and explode forward.
Explode after move
After the change of direction dribble, explode in the new direction. Don't stay there and give the defender time to recover. Who cares if you cross them up if you didn't go anywhere!?
Game-Like Cut Drill #5 - Corner to Wing > Dribble Move > Jump Shot
Now, you've crossed up the defender, but the help defense does a great job of protecting the basket.
Just like before, if help defense is sitting in the lane and you can't get to the rim, a pull up jump shot is a great counter after the dribble move.
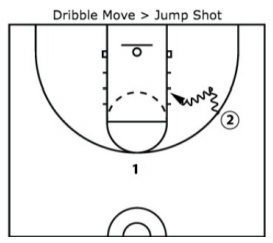
Drill Instructions:
Starting from the corner, you cut to the wing and catch the ball.
You pretend that you're going to shoot it.
Next, you take one dribble, execute a dribble move, then pull up for a jump shot.
You get the rebound then immediately start your next repetition.
Training Tips:
-
Still think shot - think lay up - snap the dribble - and explode!
The mentality is still the same! The only reason you don't drive to the basket is that defense is sitting there. You still need to think shot off the catch. You still need to think lay up off the initial dribble. You still need to snap the change of direction move and explode forward out of it. This is how you create the opening!
If you do any of those things at half speed, you don't even create separation from the defender guarding you. This will make it much easier to contest your shot and lower your shooting percentage. And you may not even create enough separation from the initial defender to even attempt a shot.
Be Great at Simple! Amp Things Up and Always Strive to Improve!
To add on what we mentioned previously, here are some specifics to what we mean...
First, with your shooting drills, work on mastering the footwork, executing the move properly, and the ability to make the shot.
After that, pick one specific aspect and amp it up! You should always pick a tiny detail to improve.
Once you master that new detail, pick a new one or try to do the current skill even better and faster.
Here are some things to think about...
Can you sprint faster into your shot? That way, you can create more separation from the defender which creates more open shots for you.
Can you become more elusive? Can you get better at getting the defender to lean the opposite way of the direction you're heading? (Hint: Tag is a great game for this.)
Can you transition into your shot quicker? When you pivot or hop, can you do this so quickly that once the ball slightly touches your hands, you're already up and into your shot?
When shooting off the dribble, can you explode out of triple threat faster? Can you create more separation from the defense?
Can you lengthen the distance you cover on your first dribble? Can you go farther and faster?
Can you pick the ball up faster, so you can shoot quicker off the dribble?
When changing directions on the dribble, can you sell the move harder? Can you lean harder in the opposite direction? Can you give a better head fake?
Can you snap the ball quicker on the change of direction dribble?
Can you accelerate quicker on your first step after the change of direction dribble?
Can you get to the basket quicker? Did you master the second and third steps?
Can you accelerate to the basket with better power and balance, so you can finish through defenders?
It doesn't matter how you good you are. It doesn't matter if you're the best player in the world. You can improve at all of these things!
My Personal Experience With Players Becoming Great at Simple Things! The Loyola Chicago Final Four Team and a Missouri Gatorade Player of the Year!
As a coach, I've been lucky to be around some great players and tremendous overachievers.
For one season in high school, I coached Clayton Custer and Ben Richardson.
Both were members of the Loyola Chicago Final Four team in 2018. That year, Clayton was MVP of the MVC conference. Ben was defensive player of the year. Both are now professional basketball players.
I learned more from them than they learned from me. Here's some important lessons about focusing on the simple stuff and attacking each drill like your life depends on it!
You can read more about this below...
The REAL Secrets To Loyola Chicago's Success! (Not What You Think)
As mentioned above, I also worked with a second player named Kyle Wolf. I worked with him for multiple offseasons and he developed into the 2013 Missouri Gatorade Player of the Year.
We took a very simplified process and focused on the exact drills above. We spent most of our workout sessions on them.
And like mentioned above, we focused on getting better at the little details. We didn't worry about doing circus drills that you find on social media. You can read more below...
Basketball Decision Training Drills For Guards and Post Players
These Basketball Decision Training Drills (BDT) from Chris Oliver are shooting drills combined with decision making. These BDT drills can translate to better shooting performance during games.
Why? Quite simply, almost all shots require a decision during a game. And you rarely shoot the same shot twice within a few seconds of each other (accessing skillsfrom short term memory versus long term memory).
The BDT drills are built around the random practice principle.
Random practice means that on each repetition you don't know the outcome prior to the catch like during a game. And each repetition might be different than the one before. You don't know what's going to happen next so each attempt requires you to interpret what to do in reaction to your partner's signals.
Random practice has been shown to improve learning and retention (long-term memory) which is why it can lead to better performance and better shooting during games. (More details on block, random, and interleaving practice)
The opposite of random practice is "Block Practice". Block practice describes repeating the same repetition in the same way. An example of block practice would be when a player shoots the same shot from the same spot over and over. Many of the drills above are block practice.
While many of the drills above are not a form of random practice, they are very important for developing your shooting technique, improving confidence, warming up, and creating rhythm.
And there are many training experts who still believe in emphasizing the use of block drills for teaching mentality... they might spend more than half of their training session using drills with block and variable practice. And there are some training experts who believe in primarily using random practice drills.
That's the beauty of training with this great game, there are many different methods to be effective!
Here is the table of contents for the video:
0:45 - Basketball Decision Training
2:12 - Decision Cues: Shooting, Dribble Attack, Passing, Counter Moves
4:24 - BDT Shooting Drill #1: Shoot or Pass
5:52 - BDT Shooting Drill #2: Pass or Drive
6:48 - BDT Shooting Drill #3: Pass - Shoot - Drive
7:30 - BDT Shooting Drill #4: Pass or Counter
8:50 - BDT Shooting Drill #5: Pass - Shoot - Drive - Counter
Basketball Decision Training Cues
The main component of BDT is that you are presented with a decision cue that dictates the action for each repetition. These decision cues can come from anyone willing to help you improve including a coach, parent, sibling, or a teammate.
As the shooter, you get value from becoming an active decision maker. The passer's skills also develop as they provide decision cues for the shooter.
Here are some examples of the decision cues in response to the hand and body signals from the passer.
Decision Cues
- Hands Out > Pass the Ball
- Hands Down > Shoot the Ball
- Step Toward > Drive
- Side Step > Dribble Counter
Each decision is game-like, so it gives you a foundation that leads to be decisions against live defense. Here are some examples of game-like decisions that align with the decision cues above.
Basketball Decisions
- Shoot the Ball IF: The defender's arms are down, or the defense is more than an arm's length away.
- Pass the Ball IF: The defender is arm's length away.
- Driver the Ball IF: The defender is running at you in a long closeout.
- Dribble Counter IF: The offense attacks and the defender takes away the initial driving angle with a chest-to-chest position.
There are some simple ways to make a drill more random. Below are ways to randomize your feet prior to receiving a pass in BDT.
Randomize Your Feet
- Dance Steps
- Split Steps
- Side Dancing
- Side Split Steps
- Runouts
Each of these repetitions represents a random way to move your feet prior to shooting. This can become more complex by moving away from the ball, then sprinting back into the catch to simulate a game action.
There are many situations where players move prior to shooting, such as when a shooter relocates after a post entry, or when a player receives a pass in transition.
Note from Chris Oliver: We encourage our passers to never throw a chest pass. We feel like the chest pass is rarely used in a game anymore. Instead, we encourage you to pass outside the frame of your body using a hook pass, a behind the back pass, or some variation of those. We want you to have fun during the workout by being creative with their passes.
The goal of the passer is to ensure that you challenge the shooter to make a unique decision on each shot so it's random and the shooter doesn't know what's coming.
BDT Shooting Drill #1 - Pass or Shoot
This is the simplest version of 2-Player BDT. The passer will give the shooter one of two signals:
- Hands Out > Pass
- Hands Down > Shoot
The passer will rebound for the shooter and initiate the next repetition followed by one of these two signals.
You can change the shooter after any number of shots, but we generally like to switch roles after 2-3 repetitions.
BDT Shooting Drill #2 - Pass or Drive
Once players become comfortable with the initial drill, we change the decision cues to include the following signals:
- Hands Out > Pass
- Step Towards > Drive
BDT Shooting Drill #3 - Pass - Shoot - Drive
The next progression includes all three possible decision cues:
- Hands Out > Pass
- Hands Down > Shoot
- Step Towards > Drive
BDT Shooting Drill #4 - Pass or Counter
After players become comfortable with these three signals we practice the fourth signal:
- Hands Out > Pass
- Side Step > Dribble Counter
This simulates that the defender got chest-to-chest and cuts you off. Then you counter with a dribble move.
Your goal is to get into a shoulder-to-chest position with the defender. The counter helps you reestablish the shoulder-to-chest advantage.
BDT Shooting Drill #5 - Pass - Shoot - Drive - Counter
Finally, you can mix all four of those decisions into one drill to make it even more game-like. We encourage coaches and players to progress to this stage as quickly as possible.
Coach Oliver firmly believes in the concept of "Hard First Instruction" because you will have a better representation of where you are going.
By making it more difficult at first, you will have a better understanding of the game-like skills and game-like decisions that you have to make. Though you may struggle initially, in the long run, this type of training helps retention and transfer to performance.
The Value of Basketball Decision Training
The value of Basketball Decision Training is that players are shooting unscripted shots. They never know in advance what shots they will end up shooting. All of their shots will be based on cues, decisions, and reads based on the signals that their partner gives them.
3-Player BDT becomes an even more complex process because there are two other players that the shooter must read. As you have fun with this and develop these concepts in your training, you can add another player by following the same guidelines in 4-Player BDT.
Basketball Decision Training can be added to any 5v0 drills as well.
To learn more, you can view: Chris Oliver's Basketball Decision Training
Why Can't You Skip BDT Drills and Go Straight To Game-Based Drills Below?
You might be wondering...
Why can't I just skip straight to game-based shooting drills (in a section below) where I compete against defenders? That seems to be a better version of game-like drills with random practice.
You certainly can. However, these drills are a great progression prior to leading into those game-based drills.
1 - Some players struggle with immediately combining technical skills with decision making. And at times, this struggle leads to very little success.
Right or wrong, this can lead to a downward spiral in confidence and performance. Ultimately, stunting development of your skills.
Alongside defensive dictation drills, these BDT drills are great connector drills to help bridge the gap between technical skill work and decision making prior to competing against a live defense.
2 - A high-level player who has mastered their shooting fundamentals might spend less time on a workout with the drills above. And spending more time on the BDT drills might serve them better.
3 - Players want to get shots up without competition.
This can be for a number of reasons.
You need an active rest day, but you still want to improve your shooting.
You don't want to risk injury.
You want to get more shots up.
You don't have any other players to practice with you. But you have somebody who can pass and rebound like a sibling, another family member, or friend.
Now, to the next section...
The Best 1v1 and 1v2 Shooting Drills Against Defense
All of your shots in games are against a defense. So it's vital that you practice this way!
Each and every shot includes a decision. And if you want your shooting practice to translate to better shooting during games, you need to shoot and make decisions against live defenders.
And for individual offensive improvement, 1v1 and 1v2 shooting drills are some of the best ways to accomplish this. They simulate the random, chaotic environment that you face during games.
This also gets you a high number of reps when it comes to integrating decision making with your shooting, footwork, ball handling, finishing, and basketball moves!
The first section shows you a genius method for progressing through 1v1 and 1v2 shooting drills.
After that, we'll show you some additional 1v1 drills that you can use. And how you can even create your own drills that are best for your situation!
4 Genius Progressions for Shooting Drills Against Defense!
In Sanderson's Game-Based Training System for 2-4 Player Drills, the two-time state champion coach Nate Sanderson shows you how to progress through 1v1 and 1v2 drills.
He shows you how to easily adjust the difficulty to appropriately challenge all players... From beginners to pros.
I think you will find that the simplicity of it and the logic behind these progressions are genius!
Progression 1 - 1v1 with disadvantaged defender.
This is a great progression for players who are just getting comfortable with new skills.
Basically, this means that the on-ball defender starts at a disadvantage. Below, we show you some easy ways to accomplish this.
Progression 2 - 1v1 Live
In this progression, the offense and defense play live. There is no initial advantage to the defense or offense.
Progression 3 - 1v2 with disadvantaged on-ball defender
Like progression 1, the initial on-ball defender starts at a disadvantage. However, a help defender has been added to the drill to make finishing at the basket more difficult.
Progression 4 - 1v2 Live
Now, the offensive player is playing live against the on-ball defender and the help defender. There is no initial disadvantage for the offense or defense.
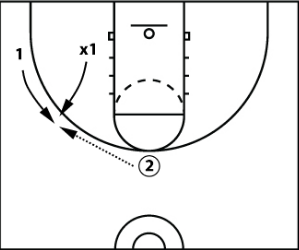
1v1 Shooting Drill With Disadvantage - Fill Up & Read
This series is also a great complement to the game-like shooting drills above. That way, you can see how you might progress and use 1v1 drills that fit into some of your other shooting drills.
This drill simulates running to the passer then looking to score off the catch. This fill cut is one of the most common actions in basketball whether it's off of a screen or not. So it's vital you get deadly at attacking in this situation.
The first progression uses a disadvantaged defender when cutting to the ball.
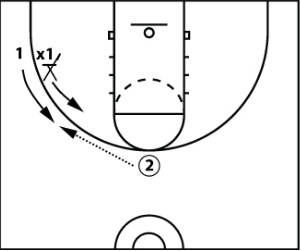
Drill Instructions:
X1 starts in the corner seated in a chair. This is the disadvantage for the defender.
1 is the offensive player and starts in the corner.
1 cuts and fills to the wing to receive a pass.
X1 becomes live as soon as the offense starts their cut to the wing.
Training Tips:
Shoot when defender is down - Think shot!
If the defender is giving you space to shoot, shoot it. That's why you need to think shot immediately off the catch.
Defender is tight - Attack!
If the defender takes away your shot, attack!
Adjust distance of shot to fit your skill level
If you can't make 3-point shots consistently without a defender, you're probably not ready to do this against a defense. You can easily adjust this drill to catch from 12 feet, 15 feet, or 18 feet.
Progress when easy
If you find yourself scoring 6 or 7 times out of 10 tries, it's probably time to progress to more difficult drills.
If you have good shooting range, you can also push it back a few feet beyond the 3-point line.
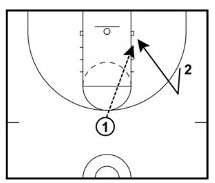
1v1 Live Shooting Drill - Fill Up & Attack
This is very similar to the progression above except you play live from the beginning. The offense does not start with an advantage this time.
You are practicing a game-like situation where you attack the close out on the wing.
Drill Instructions:
1 is the offensive player and starts in the corner.
X1 is the defensive player and is in proper helpside position.
1 cuts and fills to the wing to receive a pass.
X1 moves into proper defensive position and closes out on the catch.
Then the play is live.
Training Tips:
Adapt constraints to your offense or skills you need to focus on
You might limit dribbles. This can help you be more effective with your drives to the basket. You might limit dribbles to two or three in this drill.
Cut backdoor
If the defender is cheating towards the ball on the catch, you can allow backdoor cuts to make the defense play honest.
Another effective tool is a shot clock if you have access or enough players to use a timer.
When you drive, you might only allow middle drives or baseline drives.
If a player does not attack in a relatively straight line, you might have an automatic turnover. So in this drill, maybe all middle drives have to be inside the elbow.
There are certainly more ideas you can implement to create good habits on the basketball court. These are just a few to get you started
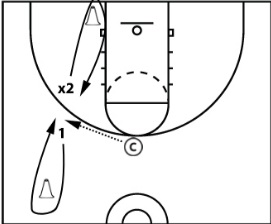
1v2 Shooting Drill with Disadvantage - Fill Up & Attack
This is a great progression for learning how to attack the helpside defense. This improves your ability to pull up for a shot in the lane or finish over a helpside defender.
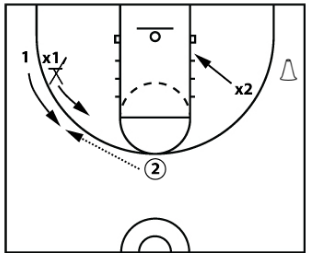
Drill Instructions:
X1 starts in the corner seated in a chair and is the on ball defender. This is the disadvantage for the defender. X2 is in proper helpside defense position.
1 is the offensive player and starts in the corner.
1 cuts and fills to the wing to receive a pass.
X1 becomes live as soon as the offense starts their cut to the wing. X2 repositions to proper helpside position based on the pass.
1 attacks off the dribble and looks to score.
Training Tips:
No jump shots off the catch
Since the purpose is to get better at scoring over the helpside defense, you are not allowed to shoot off the catch in this progression.
Attack mentality
Even though you are competing against two defenders, you still need to have the attack mentality. You may make more mistakes at first and that's okay. With repetitions, you will get better.
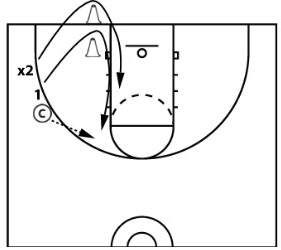
1v2 Live Shooting Drill - Fill Up & Attack
Here is an advanced progression. Not only do you have to beat the initial defender, you also have to beat the helpside defense! This is very game-like and a great drill for improving your individual offense skills.
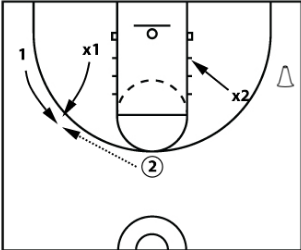
Drill Instructions:
1 is the offensive player and starts in the corner.
X1 is the defensive player and is in proper helpside position. X2 is in proper helpside position.
1 cuts and fills to the wing to receive a pass.
X1 moves into proper defensive position and closes out on the catch. X2 repositions to proper helpside position based on the pass.
1 can shoot off the catch or dribble drive attack. It's 1v2 live.
Training Tips:
Variation: No jump shots off the catch
Like the previous progression, you can also disallow shots off the catch. However, this is even harder than the progression before. This is great for improving your ability to beat the defender off the dribble and score over helpside defense.
How to Easily Create Hundreds of Your Own 1v1 and 1v2 Drills
Now that you know how to progress through 1v1 and 1v2 drills, you can create your own drills.
You just use the same approach in the section above for shooting drills with game-like cuts.
You pick a common cut or a common cut from your offense. Make sure to talk to your coach about this as well! They will have a really good idea of what happens most during the games for you.
Like mentioned before, you could simplify your approach and make sure to rotate drills that include a cut...
- Towards the ball or away from the ball.
- Towards the basket or away from the basket.
By breaking things up this way, you master the required footwork to get open.
For beginners, you might start with towards the ball and towards the basket. Those tend to be very common and also easier to master.
Here are some other examples of 1v1 drills that you can use these same progressions for.
|
1v1 Shooting Drill with Cut Towards Ball - Fill Cut This is a 1v1 drill that replicates a fill cut. This is a cut towards the ball. |
|
|
1v1 Shooting Drill with Cut Away From Ball - Fade Cut This is a 1v1 drill that replicates a fade cut. This is a cut away from the ball. |
|
|
1v1 Shooting Drill with Cut Towards Basket - Fast Break This is a 1v1 drill that replicates a fast break. This is a cut towards the basket. |
|
|
1v1 Shooting Drill with Cut Away From Basket - Zipper Cut This is a 1v1 drill that replicates a zipper cut. This is a cut away from the basket. |
|
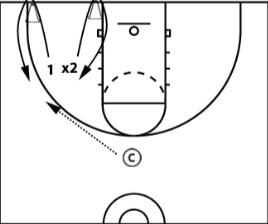

Using Cones or Chairs for 1v1 Drills?
You can also structure 1v1 drills using cones or chairs like the diagrams above. This improves your first step speed and change of direction. So this adds an athletic development component to the drill as well.
Using cones or chairs for 1v1 drills can also be advantageous as it creates automatic variation in each repetition. The timing of the arriving defender should fluctuate.
You can also modify the distance of the cones to get different looks. This can be where the defenders arrive early or late. This helps you develop a skill set to score in different situations.
Also, if a player is faster than others, you can have them start a step or two back. If a player is slow, you can do the opposite. You can start them a little closer.
To get FREE 5 Shooting Drills To Make More 3's, click the banner below
What do you think? Let us know by leaving your comments, suggestions, and questions...
|
||||||||||||||||||||


 Facebook (145k Followers)
 YouTube (152k Subscribers)
 Twitter (33k Followers)
 Q&A Forum
 Podcasts