
How To Develop Into A Great Shooter -
Basketball Shooting Practice: Drills, Workouts & Training Plans
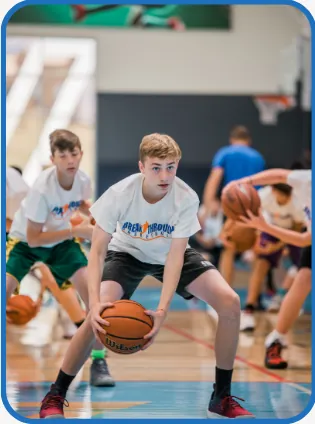
Basketball shooting practice isn’t about casually putting up shots. Effective shooting practice builds mechanics, footwork, rhythm, and decision-making under pressure. Whether you’re a youth player learning proper form or a high school athlete preparing for game-speed reps, structured basketball shooting practice can dramatically improve your consistency and confidence.
For example, when practicing, Stephen Curry must swish 5 out of 10 free throws.
Ray Allen is the first to the arena. Then he goes through a form shooting routine and progresses to 3-point shooting.
I believe the following shooting routine will help you develop into a great shooter or make you an even better shooter.
It...
- Maintains and develops sound shooting technique.
- Develops consistency in your form.
- Improves confidence
And quite simply, it just makes you a better shooter.
For youth and high school players or players looking to fix their shooting form, these progressions can be used in a shooting workout.
For advanced players, it's a great way to warm up and refine your shooting technique. That way, you stay consistent. That's why guys like Stephen Curry and Ray Allen do the "boring" form shooting drills every day.
We also want to add a shooting progression that we rarely see taught... we believe that this shooting progression will help a ton of players.
Personally, I added these unique progressions to workouts and had great results with the players I trained. That’s why we incorporated similar shooting form progressions at our basketball camps. That way, thousands of players each year can get similar results.
The Hop or the 1-2 Step
Shooting footwork is the foundation of a good shot. In the shooting progressions below, a 1-2 step is used.
Even if a shooter we train predominately hops, I still use these progressions with the 1-2 step. I found that it was the best way for me to teach the proper rhythm and coordination of the entire shot motion.
Then when we progress to drills with game shots, the player uses the hop. As a result, they have better rhythm and coordination with their shot.
How To Structure Your Basketball Shooting Practice
Step 1 - Developing The Shooting Release
The 1-Hand Form Shooting Drill
Most of you have seen this 1-hand shooting form drill. Even though it is nothing new, don't dismiss the importance of this foundational drill. This reinforces good technique of the "release" portion of your shot.
For this progression, we focus on getting our feet about shoulder width apart or slightly narrower.
You should be in a strong, balanced position.
Make sure to check your feet and develop consistency on every shot. We prefer to slightly stagger our feet or slightly turn them. The anatomy is different for every one. You need to find what works for you.
Next, make an L with your shooting arm.
Focus on pushing the ball up and out. Your elbow should finish above your eyes.
Focus on pushing the ball through your fingers. Typically, you should either finish with your index finger pointing at the hoop or with your index/middle finger pointing at the hoop. Find what works best for you.
When you properly shoot "up and out" and "push through your fingers", you will get the proper backspin on the ball.
I even recommend shooting at a wall to focus on proper mechanics. Then once you develop consistency with your feet and your follow through, move to the basket.
Summary of Emphasis Points:
- Feet - Shoulder width apart.
- Feet - Slightly staggered and/or turned.
- Strong and stable position.
- L with arm - start from this position.
- Up and Out - push up and out through your fingers.
Shooting Workout - 10 wall shots and 50 shots at basket.
-
The 1-Hand Form Shooting Drill - 10 wall shots with good technique
Do not progress until you have shot 9 out of the last 10 wall shots with sound shooting technique. It's okay if this takes you some time. The key is sound shooting technique.
- The 1-Hand Form Shooting Drill - 50 shots at basket
10 shots from 5 spots around the basket. Distance is 3 to 5 feet from the basket.
Make 8 out of 10 shots from each spot. If you do not use good technique on a shot, the shot does not count.
***VERY IMPORTANT***
You can use poor shooting technique and make shots close to the basket. As you move further from the basket, the poor shooting technique will be exposed. And you will miss more shots.
So it doesn't matter if you can make 10 out of 10 with poor technique. If you're worried about making shots, don't shoot at the basket. Technique is the most important thing here.
Once you develop good technique, then worry about making baskets.
Youth players should use proper ball size and lower goal heights for shooting drills.
Step 2 - Adding The Guide Hand To The Shooting Release
One Hand Form Shooting Drill - With Guide Hand
Next, we work on adding the guide hand to the shooting release.
Since athletes have a tendency to use their guide hand, we do not have guide hand touch the ball in this progression.
This is highly important because when you overuse the guide hand, a lot of players will miss to the right and the left. If you can eliminate shooting to the right or left, you will automatically make more shots.
Emphasis Points
- Guide hand near the side of the ball. Do not place guide hand in front or behind basketball.
- Fingers on guide hand pointing upwards.
- Keep guide hand still.
- Do not touch the ball with the guide hand.
Shooting Workout
- 1-Hand Form Shooting Drill - 30 shots
Shoot 10 shots from 3 spots. You should be 3 to 5 feet from the basket. Make 8 out of 10 from each spot before progressing to next exercise.
- 1-Hand Form Shooting With Guide Hand - 50 Shots
Shoot 10 shots from 5 spots. You should be 3 to 5 feet from the basket. Make 8 out of 10 from each spot before progressing to the next progression.
FREE BONUS PDF
5 Shooting Drills To Make More 3's
IMPORTANT - READ THIS
The next shooting drills are highly important to the shooting development process.
HOWEVER, the shooting drills that teach things like rhythm, coordination, fluidity, arc, and proper shooting release are often forgotten or neglected.
They are often misused or under-emphasized.
If you want to become a great shooter, I can not emphasize the importance of the following drills enough. They could literally be the difference between being a poor shooter and a great shooter.
Rick Penny taught me these crucial shooting progressions that literally changed the way I taught shooting.
We will cover what we call Tuck, Set, and Go (or Release) and shooting progressions to teach the shot motion.
If you don't understand these terms... Tuck, Set, Go... please read this article...Get Instant Results With This Shooting Fundamental That Nobody Teaches (Stephen Curry Uses This). It goes into great detail about these concepts and the importance of them.
If you are serious about becoming a great shooter, it's absolutely vital that you read the shooting article.
Step 3 - Set To Go
This progression is called Set to Go. This focuses on the top half of the shooting motion.
As discussed in the previous shooting article, as soon as the ball reaches approximately the shoulder position, shooters extend their legs.
If you study great shooters like Stephen Curry, the ball actually starts coming up before you extend your legs.
However, if you try to consciously do this, it can screw up your rhythm and coordination.
So we use this as a progression to develop the coordination of extending your legs to shoot as the ball passes up through the shoulder position.
Set To Go Drill
The shooter starts a few feet from the basket.
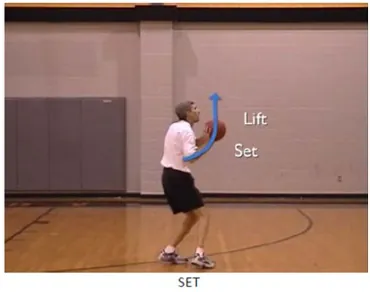
In the set position, the player’s arm angle is approximately 90 degrees and the ball is positioned near the shoulder.
Once the shooter is ready, the player extends their legs and shoots at the same time in one fluid motion. The shot is like a free throw as there is little to no jump with this progression.
We will shoot 5 to 10 shots, then take a step back. We usually do this until we reach a step in front of the free throw line.
Also, make sure to take your time and do it right on every repetition. If you build a bad habit by being sloppy, it will take you ten times as long to fix the bad habit. So be smart and get in the right position prior for every shot.
Emphasis Points
- Start from shoulder on each shot.
- Extend legs and shoot at the same time.
- Keep ball close to shoulder.
- One fluid motion - no pauses or hitches.
Shooting Workout
- 1-Hand Form Shooting Drill - 20 shots
Shoot 10 shots from 2 spots.
- 1-Hand Form Shooting With Guide Hand - 20 Shots
Shoot 10 shots from 2 spots.
- Set To Go - 40 shots
Shoot 10 shots from the distances of 3 feet, 6 feet, 9 feet, and 12 feet.
First, develop sound shooting technique. Second, as soon as you can make 28 out of 40 shots with sound shooting technique, progress to the next shooting drill.
Additional Teaching Points and Possible Errors
This is not the entire shot motion that we teach. It is just part of it.
We're building our shot from the top down.Also, here are some errors that we see.
Rushed Shots
When skipping this Set To Go shooting progression in the past, we noticed that some players developed "rushed shots". If they jump and bring the ball up at the same time, this forces the upper-body motion of the shot to be too quick. On average, not always, this results in more shooting inconsistencies.
Ball Too Far From Shoulder and Body
You don't want the ball too far from the shoulder as that will create a catapulting motion with your shot. You want your shot motion to go up and out with little motion backwards. Watch the video below for further explanation.
(Apologize for the noise in the videos... I just moved to Florida a few weeks ago and I still need to find a new gym and video crew!)
Want to Score More Points and Become
a Confident Shooter?
Coach Jim Huber's Shooting and Scoring System gives players a proven, step-by-step plan to transform your shot and raise your scoring average. Inside you'll get:
-
5+ hours of video training on mechanics, footwork, release, and shooting off the catch and dribble
-
Progression drills and 14 levels of workouts to improve at any stage
-
100+ drills and 15 advanced scoring moves to expand your offensive game
-
A workout app to track progress, customize training, and stay consistent
Step 4 - Tuck To Go - The Entire Shot Motion - Developing Proper Timing Between Legs and Shot Motion
Next, we will teach the Tuck.
This helps develop timing, rhythm, fluidity, arc, and a higher release point.
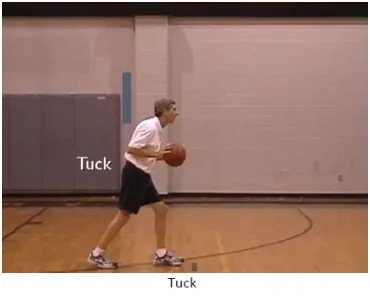
Prior to shooting, you immediately bring the ball to the Tuck position.
With the Tuck, you will have your arm angle at approximately 90 degrees with your arm parallel to the ground near your waist to shoulder level. Some players will drop to their hip and that's okay.
You immediately cushion the ball to this position when catching the ball off the pass or picking the ball up off the dribble.
Your elbow will also be tucked back near your side in a relaxed position.
S-Curve
By using the Tuck, it helps you create a positive motion to the basket with a higher release point.
Rick Penny calls this ball path the S-Curve.
Common Shooting Error - The Catapult
Some players will still go a few inches back when bringing the ball up to shoot and that’s okay.
As shown in the video below, we don’t want the exaggerated catapulting or slinging motion that creates a flat arc and slightly slower shot.
Tuck To Set Drill
This progression is called Tuck to Set.
With this progression, we just cover the timing of having the ball hit the Set point with legs loaded ready to extend and jump.
You simply say, "Tuck" and the shooter puts the ball in the "Tuck" position with their foot back. When you say "Set", the player brings their foot forward and the ball up to the set position.
The timing should be so the ball moves from Tuck into the Set position as soon as the foot hits the ground.
This helps teach the player to start the upwards motion of the ball first; prior to extending their legs to jump.
You can start slower and move up to a faster speed as players start to develop the proper rhythm and coordination.
Usually, you can do this for 10 to 20 reps before progressing. You can also adjust for more or less reps depending on the situation.
We practice this with both the left and right foot.
Emphasis Points
- Emphasize timing. Foot should hit ground as ball hits set point.
- Start slow and gradually speed up.
- Stay in an athletic jumping position. Do not extend legs.
Tuck To Go Drill - Starting With Ball
After the shooter gets the rhythm and timing from Tuck to Set, we’ll go to the next progression called Tuck To Go.
With this progression, the shooter starts with the ball in their hands.
Make sure to emphasize a nice fluid motion with the shot. There should be no pauses or hitches in the shot motion from start to finish.
Make sure the ball starts the upward motion prior to jumping. This will just be a fraction of a second. If you notice, the timing is off. Work on the previous progression again before coming back to this drill.
We like to start this progression at about 8 to 10 feet away from the basket. We believe the tuck is needed less when closer to the basket. Sometimes, it will make sense to keep the ball high or go straight to the Set position when catching the ball.
Emphasis Points
- Emphasize timing. Foot should hit ground as ball hits set point.
- Extend legs as soon as foot hits the ground.
- Start slow and gradually speed up.
- Nice fluid motion - no pauses or hitches.
Shooting Workout
- 1-Hand Form Shooting Drill - 20 shots
Shoot 10 shots from 2 spots.
- 1-Hand Form Shooting With Guide Hand - 20 Shots
Shoot 10 shots from 2 spots.
- Set To Go - 40 shots
Shoot 10 shots from the distances of 3 feet, 6 feet, 9 feet, and 12 feet.
- Tuck To Set Drill - 20 reps each leg
You will do 20 reps with left-right footwork and 20 reps with right-left footwork.
- Tuck To Go - Start With Ball - 60 Total Shots - 30 Each Leg
You will do 3 sets of 20 shots.
Each set will have 10 shots with right-left footwork and 10 shots with left-right footwork.
Start the first set from about 8 to 10 feet away.
Depending on the strength, coordination, and age level, move further away from the basket on each set.
For younger players, you might do all 60 shots from 8 to 10 feet.
Advanced players may move back 5 feet after each set.
The Tuck - Common Shooting Error And How To Fix It
Make sure that players go in an efficient path from tuck to set.
Some players with bad habits will start in the Tuck and push the ball out away from their body before reaching the Set position. This creates negative motion and often results in a catapulting motion and flatter shot. This was discussed previously.
To fix this, I will just place a hand in front of the shooter. The only way they don't hit my hand is if they go in the proper path from tuck to set.
The shooter immediately knows what it feels like to do it right or to do it wrong. The feedback is immediate.
You can do the same thing with the following shooting progression... "Tuck To Go - Start With Ball"
Here is a video explaining this error.
Something I forgot to mention in the video is that I used to put my hand beside the shooter's head next to their ear. That way, they would feel if they were slinging the ball backwards.
However, whenever I removed my hand, the same shooting habit of slinging or catapulting the basketball would come back. It drove me bonkers. When I realized that the slinging motion had more to do with the starting point and the motion coming upwards, I was able to fix the shooter more efficiently.
However, if the problem still persists after making a correction to the starting position and the upwards motion, I will put a hand next to the shooter's ear. This will help the shooter feel the slinging motion and correct it. I rarely have to do this any more if I fix the starting position and upwards motion.
Remember! These Are Just Tools To Build The Shot
I also want to reiterate that these teaching progressions are JUST tools for developing a quick and accurate shot. These progressions teach the proper starting position and the proper rhythm and coordination between the upper body and the lower body.
If these progressions are taken out of context, the drills lose their purpose.
For example, when you teach the progression of "Tuck To Go - Start With Ball", someone might argue this is too slow and you want to have your feet set as you catch the ball. This is just a tool or progression to get to that point.
Your end goal is a very quick, rhythmic shot that is highly consistent. You can see this demonstrated with the final progression below.
Step 5 - Shooting Off The Pass
Shooting Off The Pass
After the shooter starts to get the proper rhythm and timing, you can start shooting from the pass just like a game.
The 15 Year Old Who Took 3 Months - Take Your Time!
Recently, I worked with a 15 year old boy. We used these exact same progressions. It literally took us over three months to get to the point where he was consistently using the correct form in game settings and making a high percentage of shots.
And he worked on his shot 4 to 5 times a week.
Also, do not rush through the progressions and give them too much to think about!
This is one of the biggest mistakes I made when I was in my 20s. I would give them too much information. At times, it would create paralysis analysis. I still have to check myself on this.
Give them bite-sized chunks of info. Focus on fixing one thing at a time. That's why we organized this in progressions. Focus on one progression. Perfect that progression. Create the proper shooting habit, so they don't even have to think about it, then move on to the next progression.
I also would limit playing games while you're developing the form. It's not that your form can't be developed during the season or while playing games. It's just more difficult and takes more time as they are more likely to go back to their old shooting form.
For a 10 year old, this could take two years to develop.
For a committed player with good shooting technique, it might take a few weeks.
Just be patient and take your time.
Individual Basketball Shooting Practice Workouts For Beginners, Intermediate, and Advanced Players-
Sample 20-30 Minute Basketball Shooting Practice Routine
Beginner Workout
- 1-Hand Form Shooting Drill - 20 shots
- 1-Hand Form Shooting With Guide Hand - 20 Shots
- Set To Go - 40 shots - 3 feet, 6 feet, 9 feet, and 12 feet
- Tuck To Set Drill - 20 reps each leg
- Tuck To Go - Start With Ball - 30 Shots Each Leg - Start At 10 Feet
- Shooting Off The Pass - 30 Shots Each Leg - Start At 10 Feet
Intermediate Shooting Warm Up
For the intermediate and advanced players, we use a condensed version of this to warm up. It also hones the proper shooting technique. When I've neglected this warm up, players can get sloppy with their technique and miss more shots. This is why we do this at the beginning of every shooting workout.
Think of it as sharpening the tool prior to using it. Here, we are sharpening the shooting technique prior to shooting game shots.
This will probably only take 5 to 10 minutes at the beginning of every workout.
- 1-Hand Form Shooting Drill - 10 shots
- 1-Hand Form Shooting With Guide Hand - 10 Shots
- Set To Go - 20 shots - 3 feet, 6 feet, 9 feet, and 12 feet
- Tuck To Set Drill - 10 reps each leg
- Tuck To Go - Start With Ball - 20 Shots Each Leg - Start At 10 Feet
- Shooting Off The Pass - 20 Shots Each Leg - Start At 10 Feet
Advanced Shooting Warm Up
- 1-Hand Form Shooting With Guide Hand - 10 Shots
- Set To Go - 20 shots - 3 feet, 6 feet, 9 feet, and 12 feet
- Tuck To Set Drill - 5 reps each leg
- Tuck To Go - Start With Ball - 10 Shots Each Leg - Start At 15 Feet
- Shooting Off The Pass - 20 Shots Each Leg - Start At 15 to 18 Feet
Leave Your Thoughts And Comments Below!
We hope these shooting progressions help you as much as they've helped us.
Please let us know what you think and if you have any questions!
If you're looking to level up your game this year, be sure to check out our Breakthrough Basketball Camps. Led by world-class instuctors, our camps will help you reach the next level! Check out our camps page to find camps near you!
Frequently Asked Questions About Basketball Shooting Practice
What is the best way to structure basketball shooting practice?
The best basketball shooting practice is structured and progressive. Start with form shooting close to the basket to build proper mechanics. Move into stationary game shots (catch-and-shoot, off the dribble), then finish with game-speed reps that include movement, conditioning, and decision-making. A good structure includes warm-up form work, footwork shooting, competitive drills, and pressure shooting to simulate game situations.
How many shots should you take in shooting practice?
Quality matters more than quantity. For most youth and high school players, 150–300 purposeful shots per workout is effective. Instead of mindlessly shooting 500 shots, focus on game-speed repetitions with correct footwork, balance, and follow-through. Tracking makes, not just attempts, leads to better improvement.
How often should basketball players practice shooting?
Players should practice shooting 4–6 days per week during the off-season and 2–4 days per week during the season, depending on game schedules. Even 15–20 minutes of focused shooting practice consistently is more effective than occasional long workouts. Consistency builds rhythm, confidence, and muscle memory.
What are good shooting practice drills for guards?
Guards benefit from drills that simulate game actions, including:
Catch-and-shoot off ball reversals
-
Shooting off the dribble (1–2 dribble pull-ups)
Escape dribble jumpers
Relocation threes
Shooting off ball screens
Transition pull-up jumpers
Game-like movement and decision-making should always be included.
What’s the difference between shooting practice and shooting workouts?
Shooting practice focuses specifically on improving shot mechanics, footwork, and repetition. Shooting workouts are broader and may include conditioning, ball handling, and competitive segments along with shooting. Effective player development combines both structured shooting practice and full-skill workouts.
Gain the Edge to
Stand Out on the Court
Breakthrough Basketball Camps help players improve their skills and decision-making while building the confidence to shine on and off the court. Trusted by over 150,000 players nationwide, our camps provide:
-
Experienced coaches who know how to teach every level
-
Skill development in shooting, ball handling, and all-around play
-
Game-like situations that build confidence under pressure
-
A positive, motivating environment parents can feel good about
-
Beginner, Youth, and Advanced Camps - Ages 6 to 18
Next, we will teach the Tuck.
This helps develop timing, rhythm, fluidity, arc, and a higher release point.
Prior to shooting, you immediately bring the ball to the Tuck position.
With the Tuck, you will have your arm angle at approximately 90 degrees with your arm parallel to the ground near your waist to shoulder level. Some players will drop to their hip and that's okay.
You immediately cushion the ball to this position when catching the ball off the pass or picking the ball up off the dribble.
Your elbow will also be tucked back near your side in a relaxed position.
S-Curve
By using the Tuck, it helps you create a positive motion to the basket with a higher release point.
Rick Penny calls this ball path the S-Curve.
Common Shooting Error - The Catapult
Some players will still go a few inches back when bringing the ball up to shoot and that’s okay.
As shown in the video below, we don’t want the exaggerated catapulting or slinging motion that creates a flat arc and slightly slower shot.
Tuck To Set Drill
This progression is called Tuck to Set.
With this progression, we just cover the timing of having the ball hit the Set point with legs loaded ready to extend and jump.
You simply say, "Tuck" and the shooter puts the ball in the "Tuck" position with their foot back. When you say "Set", the player brings their foot forward and the ball up to the set position.
The timing should be so the ball moves from Tuck into the Set position as soon as the foot hits the ground.
This helps teach the player to start the upwards motion of the ball first; prior to extending their legs to jump.
You can start slower and move up to a faster speed as players start to develop the proper rhythm and coordination.
Usually, you can do this for 10 to 20 reps before progressing. You can also adjust for more or less reps depending on the situation.
We practice this with both the left and right foot.
Emphasis Points
- Emphasize timing. Foot should hit ground as ball hits set point.
- Start slow and gradually speed up.
- Stay in an athletic jumping position. Do not extend legs.
Tuck To Go Drill - Starting With Ball
After the shooter gets the rhythm and timing from Tuck to Set, we’ll go to the next progression called Tuck To Go.
With this progression, the shooter starts with the ball in their hands.
Make sure to emphasize a nice fluid motion with the shot. There should be no pauses or hitches in the shot motion from start to finish.
Make sure the ball starts the upward motion prior to jumping. This will just be a fraction of a second. If you notice, the timing is off. Work on the previous progression again before coming back to this drill.
We like to start this progression at about 8 to 10 feet away from the basket. We believe the tuck is needed less when closer to the basket. Sometimes, it will make sense to keep the ball high or go straight to the Set position when catching the ball.
Emphasis Points
- Emphasize timing. Foot should hit ground as ball hits set point.
- Extend legs as soon as foot hits the ground.
- Start slow and gradually speed up.
- Nice fluid motion - no pauses or hitches.
Shooting Workout
- 1-Hand Form Shooting Drill - 20 shots
Shoot 10 shots from 2 spots.
- 1-Hand Form Shooting With Guide Hand - 20 Shots
Shoot 10 shots from 2 spots.
- Set To Go - 40 shots
Shoot 10 shots from the distances of 3 feet, 6 feet, 9 feet, and 12 feet.
- Tuck To Set Drill - 20 reps each leg
You will do 20 reps with left-right footwork and 20 reps with right-left footwork.
- Tuck To Go - Start With Ball - 60 Total Shots - 30 Each Leg
You will do 3 sets of 20 shots.
Each set will have 10 shots with right-left footwork and 10 shots with left-right footwork.
Start the first set from about 8 to 10 feet away.
Depending on the strength, coordination, and age level, move further away from the basket on each set.
For younger players, you might do all 60 shots from 8 to 10 feet.
Advanced players may move back 5 feet after each set.
The Tuck - Common Shooting Error And How To Fix It
Make sure that players go in an efficient path from tuck to set.
Some players with bad habits will start in the Tuck and push the ball out away from their body before reaching the Set position. This creates negative motion and often results in a catapulting motion and flatter shot. This was discussed previously.
To fix this, I will just place a hand in front of the shooter. The only way they don't hit my hand is if they go in the proper path from tuck to set.
The shooter immediately knows what it feels like to do it right or to do it wrong. The feedback is immediate.
You can do the same thing with the following shooting progression... "Tuck To Go - Start With Ball"
Here is a video explaining this error.
Something I forgot to mention in the video is that I used to put my hand beside the shooter's head next to their ear. That way, they would feel if they were slinging the ball backwards.
However, whenever I removed my hand, the same shooting habit of slinging or catapulting the basketball would come back. It drove me bonkers. When I realized that the slinging motion had more to do with the starting point and the motion coming upwards, I was able to fix the shooter more efficiently.
However, if the problem still persists after making a correction to the starting position and the upwards motion, I will put a hand next to the shooter's ear. This will help the shooter feel the slinging motion and correct it. I rarely have to do this any more if I fix the starting position and upwards motion.
Remember! These Are Just Tools To Build The Shot
I also want to reiterate that these teaching progressions are JUST tools for developing a quick and accurate shot. These progressions teach the proper starting position and the proper rhythm and coordination between the upper body and the lower body.
If these progressions are taken out of context, the drills lose their purpose.
For example, when you teach the progression of "Tuck To Go - Start With Ball", someone might argue this is too slow and you want to have your feet set as you catch the ball. This is just a tool or progression to get to that point.
Your end goal is a very quick, rhythmic shot that is highly consistent. You can see this demonstrated with the final progression below.
Shooting Off The Pass
After the shooter starts to get the proper rhythm and timing, you can start shooting from the pass just like a game.
The 15 Year Old Who Took 3 Months - Take Your Time!
Recently, I worked with a 15 year old boy. We used these exact same progressions. It literally took us over three months to get to the point where he was consistently using the correct form in game settings and making a high percentage of shots.
And he worked on his shot 4 to 5 times a week.
Also, do not rush through the progressions and give them too much to think about!
This is one of the biggest mistakes I made when I was in my 20s. I would give them too much information. At times, it would create paralysis analysis. I still have to check myself on this.
Give them bite-sized chunks of info. Focus on fixing one thing at a time. That's why we organized this in progressions. Focus on one progression. Perfect that progression. Create the proper shooting habit, so they don't even have to think about it, then move on to the next progression.
I also would limit playing games while you're developing the form. It's not that your form can't be developed during the season or while playing games. It's just more difficult and takes more time as they are more likely to go back to their old shooting form.
For a 10 year old, this could take two years to develop.
For a committed player with good shooting technique, it might take a few weeks.
Just be patient and take your time.
Beginner Workout
- 1-Hand Form Shooting Drill - 20 shots
- 1-Hand Form Shooting With Guide Hand - 20 Shots
- Set To Go - 40 shots - 3 feet, 6 feet, 9 feet, and 12 feet
- Tuck To Set Drill - 20 reps each leg
- Tuck To Go - Start With Ball - 30 Shots Each Leg - Start At 10 Feet
- Shooting Off The Pass - 30 Shots Each Leg - Start At 10 Feet
Intermediate Shooting Warm Up
For the intermediate and advanced players, we use a condensed version of this to warm up. It also hones the proper shooting technique. When I've neglected this warm up, players can get sloppy with their technique and miss more shots. This is why we do this at the beginning of every shooting workout.
Think of it as sharpening the tool prior to using it. Here, we are sharpening the shooting technique prior to shooting game shots.
This will probably only take 5 to 10 minutes at the beginning of every workout.
- 1-Hand Form Shooting Drill - 10 shots
- 1-Hand Form Shooting With Guide Hand - 10 Shots
- Set To Go - 20 shots - 3 feet, 6 feet, 9 feet, and 12 feet
- Tuck To Set Drill - 10 reps each leg
- Tuck To Go - Start With Ball - 20 Shots Each Leg - Start At 10 Feet
- Shooting Off The Pass - 20 Shots Each Leg - Start At 10 Feet
Advanced Shooting Warm Up
- 1-Hand Form Shooting With Guide Hand - 10 Shots
- Set To Go - 20 shots - 3 feet, 6 feet, 9 feet, and 12 feet
- Tuck To Set Drill - 5 reps each leg
- Tuck To Go - Start With Ball - 10 Shots Each Leg - Start At 15 Feet
- Shooting Off The Pass - 20 Shots Each Leg - Start At 15 to 18 Feet
Leave Your Thoughts And Comments Below!
We hope these shooting progressions help you as much as they've helped us.
Please let us know what you think and if you have any questions!
If you're looking to level up your game this year, be sure to check out our Breakthrough Basketball Camps. Led by world-class instuctors, our camps will help you reach the next level! Check out our camps page to find camps near you!
Frequently Asked Questions About Basketball Shooting Practice
What is the best way to structure basketball shooting practice?
The best basketball shooting practice is structured and progressive. Start with form shooting close to the basket to build proper mechanics. Move into stationary game shots (catch-and-shoot, off the dribble), then finish with game-speed reps that include movement, conditioning, and decision-making. A good structure includes warm-up form work, footwork shooting, competitive drills, and pressure shooting to simulate game situations.
How many shots should you take in shooting practice?
Quality matters more than quantity. For most youth and high school players, 150–300 purposeful shots per workout is effective. Instead of mindlessly shooting 500 shots, focus on game-speed repetitions with correct footwork, balance, and follow-through. Tracking makes, not just attempts, leads to better improvement.
How often should basketball players practice shooting?
Players should practice shooting 4–6 days per week during the off-season and 2–4 days per week during the season, depending on game schedules. Even 15–20 minutes of focused shooting practice consistently is more effective than occasional long workouts. Consistency builds rhythm, confidence, and muscle memory.
What are good shooting practice drills for guards?
Guards benefit from drills that simulate game actions, including:
Catch-and-shoot off ball reversals
-
Shooting off the dribble (1–2 dribble pull-ups)
Escape dribble jumpers
Relocation threes
Shooting off ball screens
Transition pull-up jumpers
Game-like movement and decision-making should always be included.
What’s the difference between shooting practice and shooting workouts?
Shooting practice focuses specifically on improving shot mechanics, footwork, and repetition. Shooting workouts are broader and may include conditioning, ball handling, and competitive segments along with shooting. Effective player development combines both structured shooting practice and full-skill workouts.
Gain the Edge to
Stand Out on the Court
Breakthrough Basketball Camps help players improve their skills and decision-making while building the confidence to shine on and off the court. Trusted by over 150,000 players nationwide, our camps provide:
-
Experienced coaches who know how to teach every level
-
Skill development in shooting, ball handling, and all-around play
-
Game-like situations that build confidence under pressure
-
A positive, motivating environment parents can feel good about
-
Beginner, Youth, and Advanced Camps - Ages 6 to 18
|
|||||||||||||||||||||||||||||||||


 Facebook (145k Followers)
 YouTube (152k Subscribers)
 Twitter (33k Followers)
 Q&A Forum
 Podcasts