Get Instant Results With This Shooting Fundamental That Nobody Teaches
There is a debate in the basketball community about whether to dip the ball or not dip the ball when shooting.
I hope to offer a different perspective and show reasons why both sides actually have vital points that are relevant to developing great shooters.
Also by understanding this VITAL shooting fundamental (it’s not the dip) that very few people teach, you can greatly improve your shooting.
Until I met Rick Penny a few years back, I never heard anybody talk about this key fundamental. At first, I actually ignored teaching this part of the shooting process because I did not think it was important. Was I wrong!
But first... I want to tell you a little story about my process and how I finally had my “Ah-Ha” moment. As I believe many of you might be able to relate to this process and might have experienced the same issues.
Teaching Don’t Dip The Ball
When I first started teaching shooting, I was fortunate to talk to a shooting coach named Tom Nordland.
Tom asked me “When you watch great shooters shoot during a game, do they dip the ball?” So I went back and watched great shooters at all levels.
A very high-percentage shooters, but not all, did dip the ball below the shoulder/chest area. Most of them dipped the ball to an area around their waist.
Because of this, I did NOT use the phrase, “Don’t dip the ball.” However, I actually still didn’t teach players to dip the ball for a few reasons...
I believed it was a rhythm thing that players naturally did. How many of these great shooters dipped the ball because they taught that? Very few, if any.
I lacked confidence on how to teach it. The dip I saw being taught was different than what I saw being used, but I couldn’t put my eye on what it was at the time.
Part of me wondered if teaching this would exaggerate the dipping motion.
There were also situations that they shouldn’t dip the ball.
- Catching the ball at the waist level.
Picking the ball up off the dribble.
Shots inside of 12 feet (a step inside of the free throw line).
And I didn’t want to give the players something extra to think about if they already naturally did this.
So I figured just by eliminating, “Don’t dip the ball” from my vocabulary, it would take care of most of the issues I saw.
Looking back, I learned some of these worries were valid. Some were not, but for different reasons.
Adding The Dip To The Teaching Process and
While my approach worked for the most part... I was still running into a percentage of shooters... a rough estimate of 20% to 30% of shooters...that were rigid and stiff and not very accurate shooters as they were consciously trying not to dip the ball.
At the same time, I would see a few shooters who did not dip the below the shoulder/chest area and were very good shooters.
This confused me. Were these kids never going to be good shooters? Is it because they weren't dipping the ball? Should I be teaching the dip? Is it something completely unrelated? Is it anatomy? Is it genetic? Is it something the human mind can't comprehend, understand, or use words to describe?
So with these players, I started teaching players to catch, drop the ball to their stomach/waist level and shoot the ball. This really helped with the fluidity of the shot. They didn't look stiff or rigid anymore.
To get FREE 5 Shooting Drills To Make More 3's, click the banner below
The Issues I Ran Into With Teaching The Dip
You could tell that it relieved tension and improved rhythm.
HOWEVER... I noticed a few things. In some cases, the way I taught the dip made some shooters worse.
As mentioned before, if I wasn’t careful with the dip, it became an exaggerated motion. This dipping motion was different than the good shooters I studied.
The good shooters were still very compact with the shot motion and I felt like my shooters were not.
For some two-piece shooters, the dip created a catapulting motion. (A two-piece shot is a shot that slightly pauses when bringing the ball up to the height level near the head. Ray Allen is a two-piece shooter.)

For players that already catapulted, the dip exaggerated the catapult even more creating a flat, inaccurate shot.
The picture to the right and the video below is an exaggerated catapulting motion.
I actually would put my hand next to their head to give them instant feedback when they were catapulting the ball too much. This worked temporarily, but they would still go back to their old shooting habit of catapulting the ball.
The timing and coordination just looked off in some of these shooters.
The shots looked rushed. At this time, I was using the phrase, “Ball up. Legs Up.” I said to the players that you should jump and bring the ball up at the same time.
Looking back, this was actually creating what I call the Shawn Marion effect.
Just recently, I incorporated a new shooting fundamental to my shooting process and shooting progresses that dramatically fixed my shooting issues.
I believe this is the missing link between the dippers and the non-dippers and can dramatically help both.
We believe it’s so important that we’re adding this to our curriculum for our shooting camps to include this new shooting fundamental and shooting progressions to teach it.
I had seen this missing link 4 or 5 years ago, but for some reason I didn’t think it was important to teach in the shooting development process. It was from Rick Penny’s One Motion Shooting Video. We thought Rick’s shooting video was so precise and well taught that we actually added it to our store.
The Missing Link To Elite Shooting That Practically Nobody Teaches
Rick uses the terms Tuck and Set to describe important points in the shot process to help with teaching the proper timing and coordination.
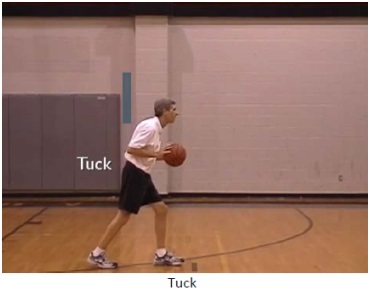
Tuck is a position when the player brings the elbow back with the ball around the stomach to waist area.
At Tuck, the forearm is parallel to the floor and elbow/upper arm is angled slightly back.
You immediately cushion the ball to this position when catching the ball off the pass or picking the ball up off the dribble.
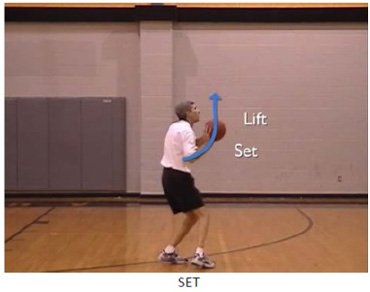
Set is the position when the ball is front of your shoulder. From my experiences and understanding, this is traditionally where the non-dippers want you to start the shot motion process.
The ball will transition from Tuck to Set to the shooting release in a fluid, constant motion. Your goal is to remove all hitches and pauses in the shooting motion.
Think Stephen Curry.
And now the missing link that I rarely see taught by shooting coaches...
It has to do with the transition of Tuck to Set. It is coordination and timing of the legs extending & jumping during the shot motion.
When the player moves the ball to the Tuck position, they immediately start to raise the ball to the Set position. However, they do not start to extend their legs right away. The hips are still down.
Only when the ball path reaches the Set position, should the players start to extend their legs and jump.
So the ball is actually already moving upwards before the player starts to jump.
However, there are no pauses in the shot motion. It is one fluid motion from Tuck to the release.
Here is a video that explains the shot motion from Rick Penny’s One Motion Shooting Video:
Stephen Curry Using The Tuck, Set, and The Proper Rhythm and Timing
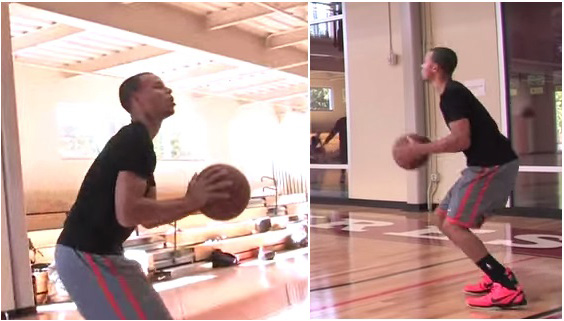
Here is a picture of Stephen Curry at Tuck.
Notice the arm angle and how it's very close to 90 degrees. The arm angle stays consistent until the release motion starts. The elbow is also tucked back by the side.
At times during games, Stephen will drop the ball a few additional inches to his hip level. For my students, that's close enough and I wouldn't adjust it.
Below is a picture illustration of Stephen Curry's shot motion. The only thing missing from the picture is the Tuck.
In the second picture from the right, you'll notice that he is bringing the ball up to Set, then he starts to extend his legs and jump as the ball reaches Set.
I also recommend you go watch his shot in slow motion on YouTube.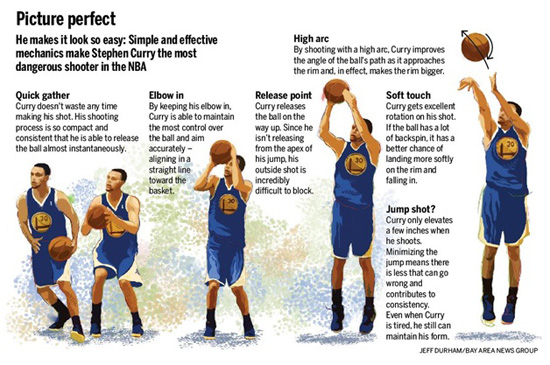
Why My Players Develop A Rushed Shot - The Shawn Marion Effect
So my phrase “Ball up. Legs up.” and the timing that I taught was screwing up some shooters because they literally did what I was teaching. Since the players were starting their jump from the Tuck position rather than the Set position, the upper part of the shot motion was rushed to keep up with the timing of the jump. This was the Shawn Marion effect I referred to earlier.
However, when I video recorded the best shooters I worked with, they were naturally incorporating the correct timing despite my faulty teaching.
This is where the non-dippers were exactly right about the importance of the Set position! They saw that the ball was always in this position as the player started to extend their legs to jump.
And the dippers were right about relieving tension and rigidity and improving rhythm and fluidity.
I believe Rick found the missing link with the combination of...
The timing of the legs extending at the same time as the ball moved upward from Tuck to Set through the release.
And a very precise motion of dropping the ball with the Tuck.
The Importance Of The Tuck And How It Creates Rhythm, Fluidity, Better Arc and Eliminates Catapulters
The issues previously mentioned that I had with the dip were fixed.
The exaggerated dip was eliminated because the Tuck was very precise and told you where to bring the ball prior to starting the shot process.
-
When a dip wasn’t needed, it wasn’t used.
As you can probably see, the Tuck is easy to teach.
The players stopped catapulting.
When I started teaching the dip, the catapulting motion even became more exaggerated. This happened because players were starting the ball too far away from their body. It was not in the Tuck position.
Then when they brought the shot up, the inertia created negative motion backwards. Thus, the ball came behind the head or to the side of the head even more.... creating a flat, inaccurate shot.
So when I added Rick Penny’s Tuck, the ball was brought in closer to the body which eliminated the catapulting motion.
The Tuck created better arc.
Because the ball started closer to the body with the Tuck, the path of the ball naturally went up and out as shown in Rick’s video above.
Due to the starting position and the motion of the shot, it naturally gave players the optimal arc.
Opposed to traditional thinking, I also found due to a quicker release, a higher release point, and more arc on the flight of the ball, it was harder to block the shot.
The Tuck also relieved tension and improved the rhythm and fluidity of the shot which is the reason most people use the dip.
When the Tuck is added to the proper timing and teaching progressions, you develop a quick, smooth shot motion that is highly accurate.
I don’t how else to say it.... You just look like a shooter.
Of famous shooters, this shot motion is most-related to Stephen Curry’s shot.
So when the light bulb went on (a rare occasion for me), I went back and watched Rick’s One Motion video again. I watched great NBA shooters in slow-motion and Rick was exactly right.
I was very happy and a little frustrated that the answer had been in front of my face for all of these years, and I hadn’t been teaching it this way.
So Rick then taught me the shooting progressions to help teach this proper timing between the legs and the shot motion.
After teaching this, I truly believe that if you incorporate these progressions, that this alone will fix most of your shooting problems.
Final Note and Why Shooting Technicalities Became Less Important
The real beauty of teaching the rhythm, timing, and coordination of this shot motion (Tuck to Set to release) is that it helps your shooting no matter what your belief system is on the technicalities of the shot.
For example...
- Finger placement on ball - Index finger in the middle of the ball or two finger split between index finger and middle finger.
- Feet position - Slightly turn the feet or stagger the feet
- Footwork - hop or 1-2 step
- One piece or two piece shots
I found when I focused more on big picture things and I stopped focusing on the little technicalities, a lot of these points became less important.
These were the things I focused on.
- Are you balanced?
- Is your hand under and behind the ball? Is your index finger near the center of the ball? (This can mean split or directly in the middle.)
- Is the ball on your finger pads?
- Is your shooting shoulder pointing to the goal?
- Are you relaxed? Is your shot fluid?
- Do you have proper rhythm and timing between Tuck, Set, and your release?
- Are your mechanics consistent on every shot?
A good summation was.... are you an athletic shooter?
There are many ways to successfully teach shooting the basketball and we hope that this is something you can add to your toolbox.
Also, we would appreciate your thoughts on this topic.
And let us know if you want us to create a video of the shooting progressions that we used to teach the Tuck, Set, and the proper timing of the shot motion.
It is probably the most effective, yet simplistic shooting progression I've ever used.
If you're looking to level up your game this year, be sure to check out our Breakthrough Basketball Camps. Led by world-class instuctors, our camps will help you reach the next level! Check out our camps page to find camps near you!
Gain the Edge to
Stand Out on the Court
Breakthrough Basketball Camps help players improve their skills and decision-making while building the confidence to shine on and off the court. Trusted by over 150,000 players nationwide, our camps provide:

-
Experienced coaches who know how to teach every level
-
Skill development in shooting, ball handling, and all-around play
-
Game-like situations that build confidence under pressure
-
A positive, motivating environment parents can feel good about
-
Beginner, Youth, and Advanced Camps - Ages 6 to 18
What do you think? Let us know by leaving your comments, suggestions, and questions...
|
|||||||||||||||||||||||||||||||||||||||||||||||||||||||




 Facebook (145k Followers)
 YouTube (152k Subscribers)
 Twitter (33k Followers)
 Q&A Forum
 Podcasts