
2-3 Zone Defense, Tips, and Drills
The 2-3 zone is one of the most popular and enduring defensives in basketball—and for good reason. Its structure allows teams to protect the paint, force low-percentage perimeter shots, and control tempo, even when facing more athletic or skilled opponents. For coaches, the 2-3 zone offers a way to stay competitive, conserve energy, and dictate the flow of the game without relying on constant man-to-man pressure.
The 2-3 zone is about discipline, spacing, quick rotations & communication. It allows defenders to collapse quickly on drives, cover high-percentage areas of the floor, and limit fouls while still applying pressure. It’s also incredibly teachable at all levels — making it a go-to option for programs looking for both simplicity and strategic depth.
Listen to Coach Al Marshall, who used the 2-3 zone to win over 700 career game, talk about why you should consider the 2-3 zone defense.
In this comprehensive guide, we’ll break down every major aspect of the 2-3 zone: player roles, coverage rules, slide rotations, teaching progressions, adjustments for different offensive attacks, and drills that bring it to life in practice. Whether you're installing it for the first time or refining a system you already use, this page is built to give you the tools, clarity, and confidence to run a great 2-3 zone.
2-3 Zone Defense Alignment & Rotations
The 2-3 zone was made famous by Jim Boeheim and Syracuse. This zone works because it limits open 3’s while also protecting the paint and putting your players in great rebounding position. Let’s look at the basic rotations and responsibilities.
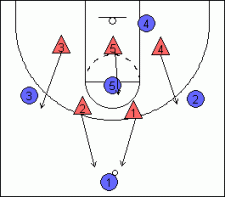
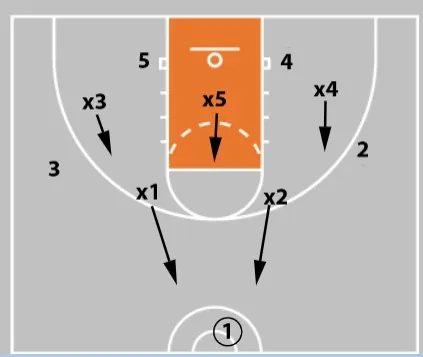
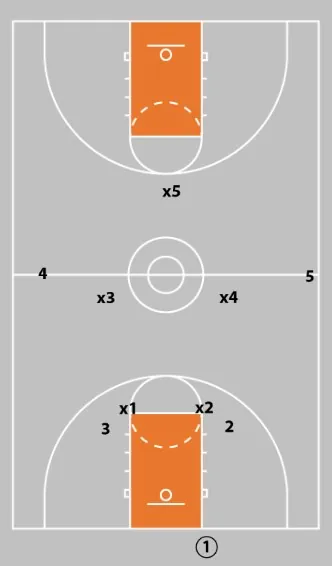
2-3 Zone Overview
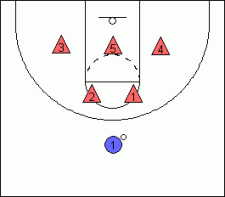
-
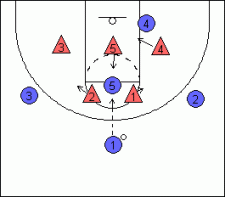
This is the original set on the 2-3 zone. The top two players will pinch towards the middle to stop dribble penetration.
-
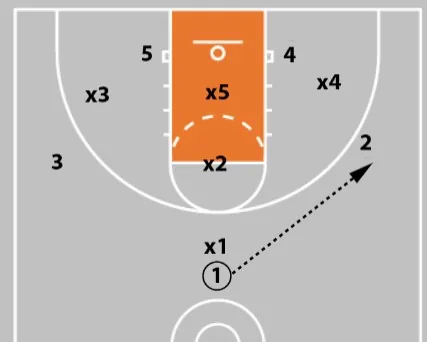
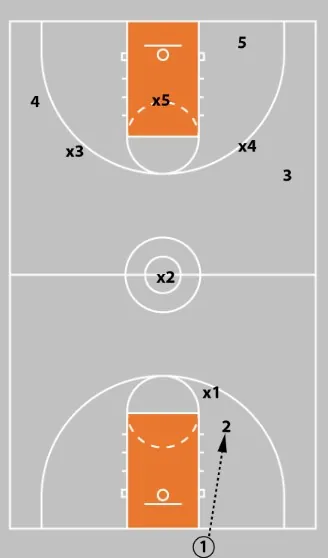
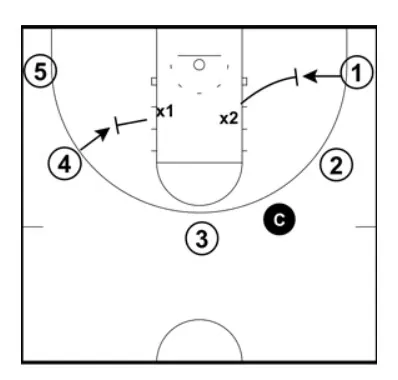
Pass to the Wing:
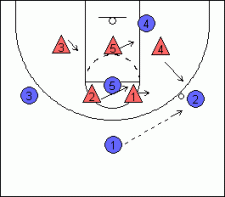
Player 4 comes up to stop the outside shot and dribble penetration. Player 1 hustles over to the wing to guard the ball. Player 2 slides in front of the high post. Player 5 slides over a couple steps at first to cover the player on the low block.
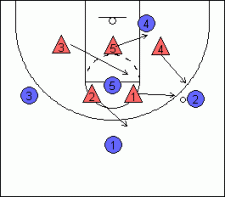
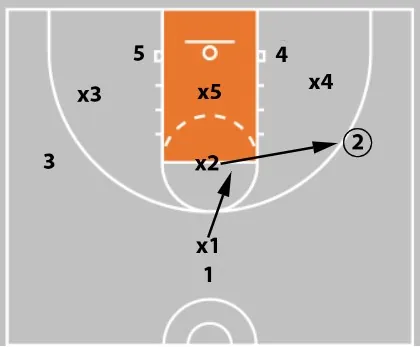
The transition to the next diagram should only take a split second.
As soon as Player 1 recovers to guard the wing, he or she will push Player 4 down. Player 4 will slide down to cover the player in the short corner. Player 5 can step up towards the middle of the lane to guard the player in the high post if he receives the ball.
Player 2 has two options:
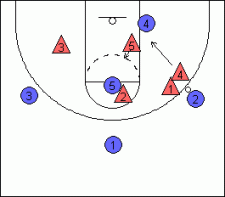
- If the player in the high post is hurting you, he'll probably want to sink down and deny the entry into the high post. He'll want to stay on the top half of the player, so he can still rotate to cover the ball at the top of the key.
- If the opposing team is hurting you from the 3-point arc or the opposing player in the high post is not a threat, you can have Player 2 cheat towards the top of the key. Generally, this will also enable him to create a few more turnovers during the game.
-
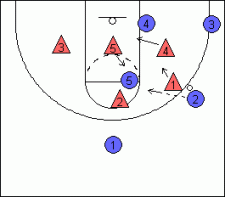
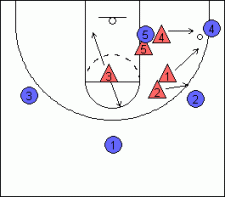
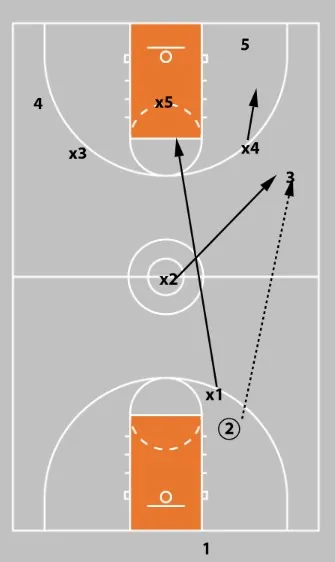
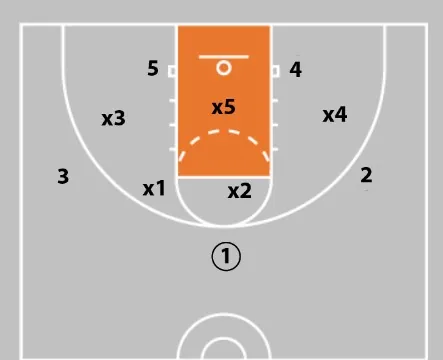
Pass to the Corner:
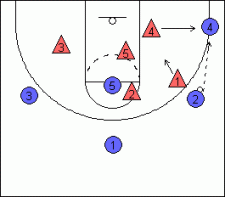
Player 4 guards the corner. Player 1 takes a couple of steps inside the 3-point line, but he should still be within reach to defend the shot on the wing.
-
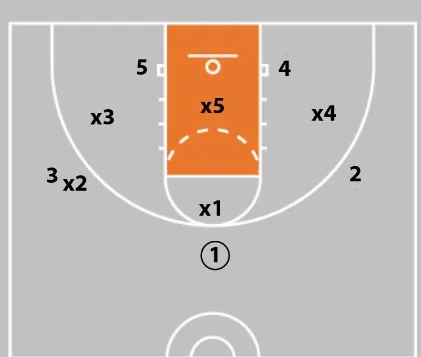
Entry into High Post from the Top of the Key:
Player 5 steps up to guard the ball. Player 4 takes away the player on the block.
If you have trouble getting your players to pinch towards the player on the block, you can set a rule: Every time the ball is entered in the high post, Players 3 & 4 pinch no matter what. We've had to do this with our high school squads.
Players 1 & 2 have their hands up to defend the pass back out to the wings, but need to be ready to swipe at the ball if the player in the high post decides to dribble.
-
Entry into the High Post from the Wing:
Player 5 steps up to guard the ball. Player 4 pinches to deny the pass to the low block. Player 1 steps back into the lane a couple steps.
-
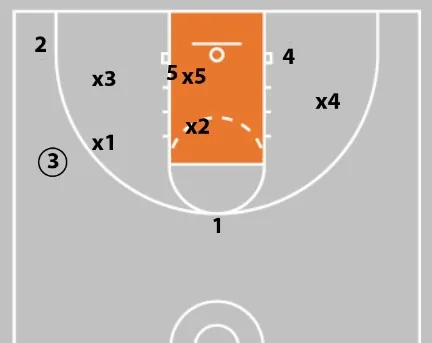
Entry Pass into the Short Corner:

Player 4 & Player 5 immediately trap the ball. Player 1 denies the pass back out to the wing. Player 3 rotates to deny the ball to the player in the high post. Player 2 plays center field trying to steal a pass thrown to either player.
-
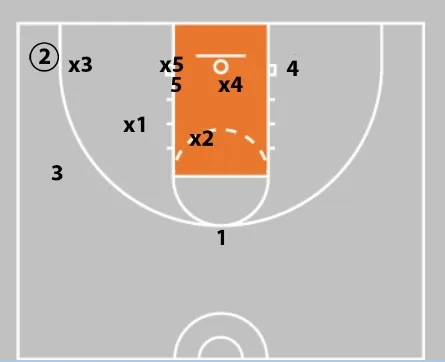
Skip Pass - Top of the Key to the Corner:
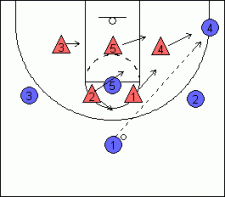
Here's the proper rotation if a skip pass is thrown from the top of the key to the corner:
-
Skip Pass - Wing to Wing:
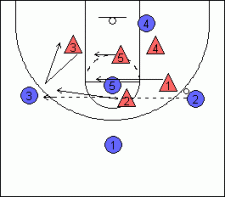
Here's the proper rotation if a skip pass is thrown from wing to wing:
Player 3 takes away the outside shot until Player 2 rotates over to guard the ball. Player 3 waits until Player 2 nudges him back down. Player 1 rotates over to the opposite side.
-
Trap the Top of the Key:
You can have your top two players trap the ball the second the ball is dribbled past half-court. Players 3 & 4 need to deny the pass to the wing and Player 5 needs to deny the pass to the free throw line. If the players can't deny the wings in time, the trap will fail and the offense will get an easy bucket.
This is generally used only once or twice a game to surprise the offense.
-
Trap the Wing
:Players 1 & 4 trap the wing on the pass. Player 5 rotates over to deny the pass to the block. Player 3 rotates over to deny the pass in the high post and Player 2 denies the return pass to the top of the key.
-
Trap the Corner:
Players 1 & 4 trap the corner. Player 2 slides over to take away the return pass to the wing. Player 5 fronts the post to deny the pass. Player 3 plays center field and tries to steal a pass to the wing or the top of the key.If a player slides into the high post, Player 3 denies that pass.
To get FREE 5 Drills For A Dominant 2-3 Zone, click the banner below
5 Ways Al Marshall’s Adjusts His 2-3 Zone To Exploit His Opponent’s Weaknesses
Coaches are notorious for their “What if’s?” Often, these “what if’s” cast doubt on a specific strategy.
No matter how far fetched, it’s easy for coaches to fall into this. We want to be prepared for anything. As a result, we imagine everything that could go wrong.
One stereotype of the 2-3 zone is that it’s played 1 way, regardless of the personnel of the team playing it or their opponents.
False! In fact, there are a number of tweaks you can make to your 2-3 to tailor it to the needs of your team. Coach Al Marshall’s 2-3 Zone Defense used all these and more on his way to over 700 career coaching victories.
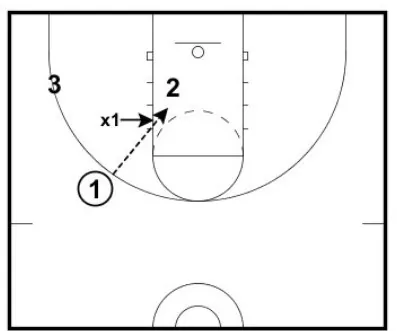
“What If I Have Athletic Guards?”
Some coaches worry athletic guards will be wasted in a 2-3. Not at all!
Option 1 - Move Up The Zone
Simply move the zone up. As you can see here, all 5 players move from their typical starting spots.
X1 & x2 will apply pressure to 1, trying to force a bad pass.
The backline players try to anticipate the next pass and are in position to go for a steal.
Option 2 - Tandem Start
Instead of starting in a traditional 2-3 look, have your guards start in a tandem formation.
x1 comes up to press the ball, leaving x2 to guard the high post.
On a wing entry, x2 takes the first pass.
X1 drops to the high post.
What If I Want To Play 2-3 But Also Want To Press?
Many coaches perceive a 2-3 to be a passive defense. That’s only the case if you play it that way.
Here are a couple pressing options.
Option 1 - 2-2-1 to 2-3
A 2-2-1 press is a natural complement to a 2-3 zone. Players are in the same formation, just extended full court.
You can play the press as aggressively as you want before falling back into the 2-3.
Option 2 - Tandem Full Court Press
A second option is to apply the same tandem principles we covered above.
Have your best guard defender (x1) apply full court pressure. They will defend whoever catches the inbounds pass and look to force a bad decision.
At the very least, they should be able to get the ball out of the hands of the offense’s primary ball handler.
If the ball is advanced, normal tandem rules apply.
The other guard (x2) takes the wing pass.
X1 sprints back and covers the high post.
What If I Am Playing Against A Great Perimeter Player?
Option 1 - 1-3 Chaser
In this case, 4 players are playing normal 2-3 rules. The 5th player is denying the other team’s star. In this example, that’s x2.
The forwards start a step higher than normal. This gives 1 extra help as they would have the top and would also need to cover the wing after the forward stunts.
The rotations are the same for the 4 zoning players. This means this variation does not take a lot of practice time.
Option 2 - Box The Star
In Coach Marshall’s terminology, boxing the star means trapping. In other words, whenever the star player has the ball, you run a 2nd defender at them.
This does a couple things:
Forces lesser players to beat you
-
Creates opportunities for turnovers, especially if the star catches the ball in the corner
What If I Am Playing Against Good Shooters?
It’s unusual to play a team that has 3 outstanding shooters on the perimeter.
You can take advantage of this by playing closer to the great shooters and not devoting as much attention to the poor shooters.
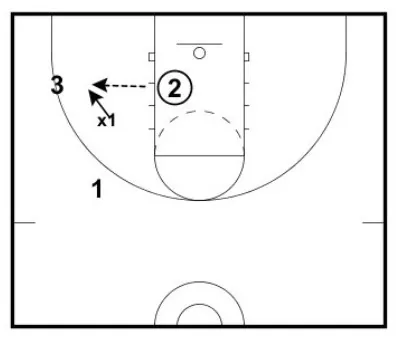
Poor Shooting Wing
If the poor shooter is on the wing, the guards can shift a little bit the opposite way.
In this scenario, 2 is the weaker shooter.
As a result, x1 & x2 shift to stay closer to 1 & 3.
Poor Shooting Point Guard
If the point guard is a weak shooter, the x1 & x2 will flatten out & widen out. This keeps them closer to the wings.
X5 will step up higher. If there’s an offensive player in the high post, x5 will play them 1v1.
X3 & x4 are ready to drop down to the basket area on any high post pass.
Coach Marshall sums it up this way, “with the zone, sometimes you may not be able to stop a team from shooting, but you can pick who shoots.”
What If I Am Playing Against A Great Post Player?
In this case, you want to prevent them from getting the ball. This requires other players in the zone to shade towards the post player, making the post pass unavailable.
Ball On Wing
When the ball is on the wing, the opposite guard (x2) and ball side forward (x3) help deter the post pass.
X2 drops down an extra step.
X3 pulls in an extra step.
Ball In Corner
When the ball is in the corner, the guards drop down further.
x5 plays on the bottom side of 5, meaning any post pass would have to be on the top side.
X1 & x2 are in position to make a play on that pass.
A Defense That’s Ruggedly Flexible
The phrase “rugged flexibility” has become popular recently. It suggests something that is tough and durable but also can adapt and change without breaking.
That’s exactly what a good defense should be.
Players should have clarity on the mission and the absolutes. But they should also have confidence in their ability to make necessary changes when those pesky “what if’s” present themselves.
Al Marshall’s 2-3 Zone Defense does just that. In doing so, it creates the ultimate "what if" for your opponent - “what if we can’t score on this defense!”
3 Drills For The 2-3 Zone Defense
2-3 Zone Defense Drill #1 - 1v1 Full Court Closeout
A great zone defense starts with the ability to guard the ball. Check out a tough closeout drill Coach Marshall used to develop individual defensive skills in the video below.
2-3 Zone Defense Drill #2 - Rebound By Numbers
Rebounding out of the zone is a common concern. To do so effectively, defenders must identify their box out as soon as the shot goes up. This drill helps work on that skill.
Setup:
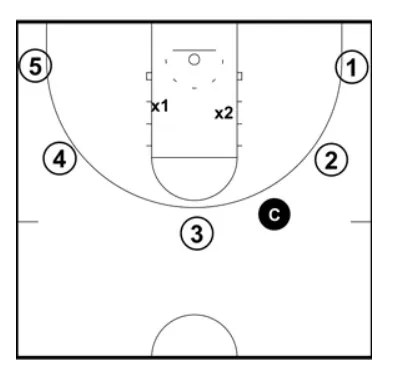
The drill starts with 5 offensive players and 2 defensive players.
The defensive players are positioned in the paint.
Offensive players are positioned beyond the 3 point line and are number 1-5. The coach starts with the ball.
Instructions:
The drill starts with the coach shooting the ball. As they shoot, the coach will call out two numbers.
The two players whose numbers are called go to rebound (4 & 1 in this diagram). X1 & x2 must find and box out those players. Play through the rebound.

If you have fewer players, you can adjust the drill. In this diagram, you see it done with 3 offensive players & 1 defender.
Coaching Tips:
Stress communication. The defenders must talk to make sure they aren’t boxing out the same player.
You can play the drill through the rebound or play it live until someone scores.
To make the drill harder, allow the offense to move before the coach shoots.
2-3 Zone Defense Drill #3 - Deflection Drill
Active hands are a must in the zone. Defenders should try to read the eyes and shoulders of whoever has the ball. By doing so, they put themselves in position to deflect passes and create turnovers. This drill builds those habits.
Setup
3 offensive players form a triangle.
1 defensive player starts in the middle of the triangle.
Player 1 has a ball
Instructions
Offensive players pass among themselves.
The offensive players are not allowed to move or dribble.
X1 attempts to deflect as many passes as possible.
Coaching Tips:
You can run the drill for a predetermined period of time (:45) or you can have the defender switch out when they get a deflection. In that case, the player who threw the deflected pass would become the new defender.
The defender should read the eyes and shoulders of the passer to predict where the pass will go.
Make this a passing drill too. Encourage your offensive players to use pass fakes and take pride in not getting passes deflected.
You can build this drill up and make it 4v2, 4v3, 5v3 or 5v4.
To get FREE 5 Drills For A Dominant 2-3 Zone, click the banner below
2-3 Zone Defense Articles & Tips
For more information on how to play a stifling 2-3 zone, check out the 2-3 Zone Defense With Al Marshall!
Zone Defense & Youth Basketball
While zone defenses are highly effective at the youth level (in terms of winning), they are ineffective when it comes to player development. Read more here:
“Buzz” 2-3 Zone Half Court Trapping Defense
The Buzz is a trapping 2-3 zone defense. It picks up the ball around half court and uses unconventional rotations and positioning to bait the offense into difficult and slow passes. It also looks to trap in various areas of the court. It’s great as a standalone defense or as a change of pace! If you’re looking to confuse your opponents and create some turnovers, this defense is a great option
Learn more about this aggressive half court zone trap by clicking the box below!
|
|||


 Facebook (145k Followers)
 YouTube (152k Subscribers)
 Twitter (33k Followers)
 Q&A Forum
 Podcasts