Stop Better To Start Converting More Drives
I’m coaching middle school basketball for the first time. In one of our first games, we did a pretty good job of getting to the basket.
We had worked a lot on this. How to rip through. How to ‘clip the hip’ and get shoulders towards the rim. How to catch the ball in a sprinter’s stance.
The starts of our drives were good. The stops. . . not so much.
We had a play early in the game where one player had a transition opportunity. She was a step ahead of her defender. She used her speed dribble to get to the rim, only to rocket the ball off the backboard as she flew into the pad beyond the baseline.
We had another player who broke down the defense a couple times to get to the rim. When the help defender came over, she was unprepared and off balance. This resulted in travels as she stumbled to try to stay upright.
This taught me an important lesson - while it’s critical to teach how to start drives, it’s just as important to teach how to stop them.
Are you working on this? If not, now’s the time to start.
“Million Dollar Move, 10 Cent Finish”
You may have heard that saying before. It applies perfectly to the situations I described above.
Of course, you don’t want to hear someone describe you that way.
How can you prevent it? By having body control at the end of your drives. What does that mean? It depends on the situation.
1 Foot Body Control - “Up, Not Out”
Most associate body control with balance. For that reason, most players think of 2 foot stops. And yes, 2 foot stops can give you body control.
However, not every situation calls for a 2 foot stop. If you are ahead of your defender, getting to 2 feet slows you down and allows your defender to catch up.
So, how can you have body control when finishing off 1 foot?
By finishing UP.
In the first example above, my player correctly used a 1 foot finish. However, when she shot her layup, she looked like she was doing a broad jump.
All her momentum was going forward. This led to the ball leaving her hand with a lot of force. When it hit the backboard, it came off way too hard.
In a situation like that, you still need to go off 1 foot. However, you need to make sure that when you jump to shoot the layup, you are jumping up and not out.
Here’s a way to practice this:
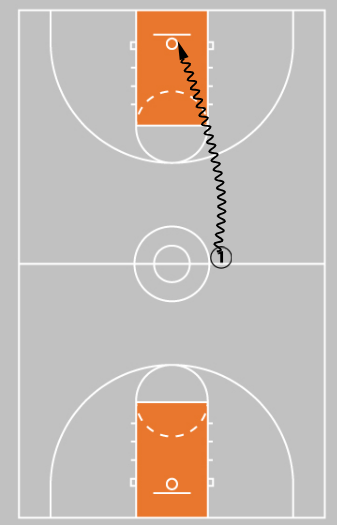
-
Start at half court, on one side of the circle. Take 2-3 (2 for older players, 3 for younger) dribbles and finish at the rim. As you do it, focus on:
Only decelerating on the last couple steps. If you do it earlier, you’ll lose your advantage (think of Luka).
When decelerating, take some smaller choppier steps that allow you to transfer momentum from out to up.
Finish with the ball extended above your head
-
Do 5 reps on each side
On the right side, use a right hand dribble and shoot a right hand layup.
On the left side, use a left hand dribble and shoot a left hand layup.
-
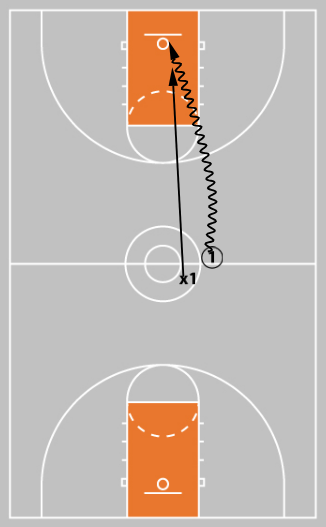
Once you feel comfortable, add defense.
-
Do the same thing but have a teammate start 1 step behind you on the inside. Now you must finish with speed while being chased by a defender.
-
2 Foot Body Control - Can You Find Stillness?
Yes, stopping on 2 feet provides better balance. At least, it should. However, don’t assume that just because you stop on 2 feet means you’re balanced.
I’ve seen numerous players jump stop or stride stop and end up falling over. This generally happens for a couple reason:
-
As in the 1 foot example, you jump too far, meaning your momentum is still pulling you forward after you land.
-
You land with narrow feet, reducing your balance. Your feet should generally be outside your body.
Here’s a couple ways to practice 2 foot stops:
-
Learn the footwork without a ball - This allows you to master the footwork without the distracting stimuli of a ball. Yes, you’ll eventually need a ball, but this is a great starting point.
Even if you are comfortable with the footwork, it’s a great warmup.
In Next Level Finishing Moves With Jim Huber, Coach Huber demonstrates different types of 2 foot stops.
For those who are more experienced, add a ball and do the same progression, getting 8-10 reps of each 2 foot stop.
-
Go through the “Elbow” routine - in The Flow Motion Offense With Matt Lewis, players go through a drill called Elbow Finishing. This drill works on different finishes off a stride stop.
Perform the same set of finishes. Get 3-5 reps on each side.
As you work on your 2 foot finishes, here are a couple ways to ensure you truly are on balance:
-
Pause on 2 - when you get to 2 feet, pause for 1-2 seconds before performing the next finish. If you are able to do this without feeling like you’re going to fall over, that’s a good sign.
-
Have someone push on you - have a partner push you on the shoulder when you get to 2 feet. Can you resist? If so, you are on the right track.
Start Working On Stops Today!
Getting to the rim is great. You must learn that skill.
Just don’t forget to practice what to do once you’re there.
Working on your stops will ensure that you don’t waste the advantage your drives create.
For more ways to finish effectively, check out Next Level Finishing Moves With Jim Huber.
What do you think? Let us know by leaving your comments, suggestions, and questions...
|
|||


 Facebook (145k Followers)
 YouTube (152k Subscribers)
 Twitter (33k Followers)
 Q&A Forum
 Podcasts