The Ultimate Finishing Drill: Use Back Attack To Improve At The Rack
At all levels, the ability to finish is a separator. It's so frustrating to see your team consistently get to the rim and be unable to convert.
It's easy to feel like you've done your job in those situations. As the saying goes, "you can lead a horse to water, but you can't make it drink." You were able to create a situation where the ball got to the rim. Unfortunately, you can't shoot the layup for them!
While this feeling is understandable, it's not helpful. Yes, part of your coaching job is creating the scoring situation. However, if your players can't convert, you need to coach that too!
Back attack is a great way to work on finishing moves. It is easy to teach and you can switch emphases throughout the drill to focus on different skills.
FREE BONUS PDF
10 Small-Sided Games For Player Development
Back Attack Setup
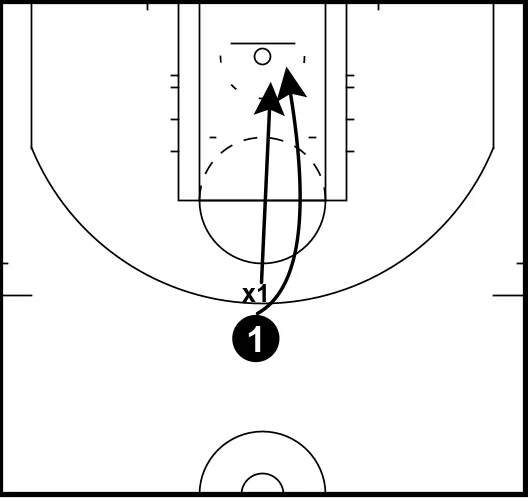
The setup for back attack is simple. The offensive player has a ball and sets up somewhere on the three point line, facing the rim. The defender is right in front of the offensive player.
However, instead of facing the offensive player, the defender is facing the rim, too. They must keep their eyes on the rim.
The offensive player places the basketball on the defender's back. When the offense goes, it's live.
The beautiful thing is that's all you have to do to teach the drill. If you're like me, you've used drills before that were too complicated. In those situations, your players end up focusing more on how to run the drill than how to develop their skill.
Back attack does not have that issue! It's a fun and competitive game-based drill.
Another strength of the drill is it doesn't require a passer or coach. Players can self-organize and get right into the drill. This allows you to circulate and coach at various hoops (if you have 6 hoops).
If you only have two hoops, have multiple groups on the same hoop. As soon as one group finishes, the next group goes.
Back Attack Teaching
Now that your players know how to run the drill, you can modify the drill to the needs of your team.
How do you do this? Use constraints.
Constraints are tools you can use to change a drill and emphasize certain skills.
There are a number of constraints you can use with back attack:
- Must use your weak hand - no matter which way your player goes, they must finish with their weak hand.
- Must finish off 2 feet - this is a great way to get your players to work on getting a strong base to finish at the rim.
- Must use the backboard or can't use the backboard - this encourages your player to work on different types of shots at the rim.
- Can't put a second hand on the ball to finish - this forces the offensive player to work on scoop finishes.
- Must finish on the opposite side they start on - So if a player drives right, they must come back left to finish, and vice versa.
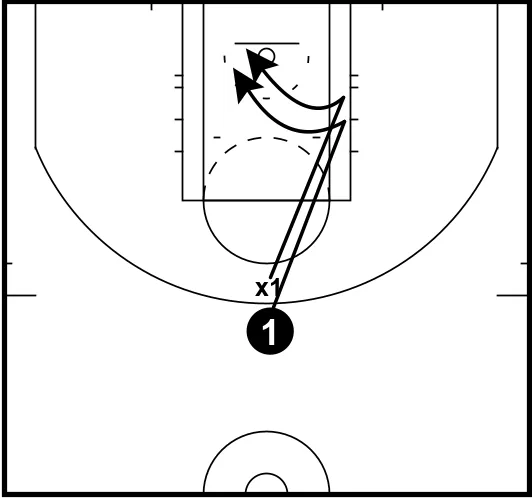
- However, sometimes the offensive player won't be able to beat the defender. It's important to have a solution in these situations, too.
Ideally, your player beats their defender to the rim and can veer back across to the other side. This teaches them to drive physically and to cut off the defender once they've gotten a step advantage.

This is a chance to work on protection plans. For instance, some players might convert a drive to a post-up (often called a Barkley). They can then work their way back across to the other side of the rim.
Coaching Considerations When Using Back Attack
Here are some things to consider as you use this drill:
- Teach footwork - as you know, footwork is crucial in basketball. When you first do this drill, you will see a lot of players start from a square stance.
- Make sure they drive both ways - some players will only want to drive to their strong hand. You can fix that.
- Help players who need a bigger advantage - back attack gives the offense an advantage. They know when they are going. The defense doesn't.
- No jump shots - some players will want to shoot jump shots in this drill. That is not the point! Tailor your scoring system to reinforce this.
- Drive at the rim - a bad habit too many players have is making banana-shaped drives. This allows the defense to recover and take away the offense's advantage.
- Start from different angles - how many games of 1v1 have every possession start at the top of the key? Too many!
- Coach the defense, too - yes, this is primarily an offensive drill. But your defenders should be competing as well! No matter how good they are, every player will get beat.
This is slow! To show them why, ask them to show you how they would stand if they were about to start a race. All of them will get into a split stance.
Once they recognize that, make sure they are starting the drill this way. That's how you want them to start drives in games, so they should use it in this drill.
If you see a player doing that, modify the drill just slightly. Stand behind the offensive player as they set up to attack.
Touch one of their shoulders. Whichever shoulder you touch, that's the way they have to start their drive. This allows you to control which way they drive.
However, that may not create enough of an advantage for some players.If your players are struggling to beat their defender, tweak the setup.
Have the drill start exactly the same, but don't have the offense rest the ball on the defender's back.
This slight change gives the offense more of an advantage. Not only does the defender not know when the offense is going, they can no longer feel the ball come off their back to initiate the repetition.
This should allow all players to get an advantage.
For instance, you can say that only shots at the rim count. Or a jump shot is a loss of possession. However you phrase it is up to you. But make sure you address this so players focus on the point of the drill.
Tell your offensive players to clip the hip. In other words, as they initiate their drive, they want to have their inside shoulder brush the defender's hip.
This ensures they are going towards the basket and also encourages them to get low on their drives.
Somewhere along the way, players pick up the idea that's how 1v1 should begin.
Problem is, that's not gamelike. In games, drives start from all over - the corners, the wings, the slots, the top.
Make sure your players attack from different angles.
One way to do this is to use the 5 out spots (corners, wings and top). You could say every time you score, you move to the next spot. Once you've scored at all 5, you work your way back.
If you want to give your players more freedom, tell them to choose a new angle for every rep.
Again, there's more than one way to do it. What's important is that you address it.
Being able to recover after getting beat is a skill. This drill allows your players to work on it.
Ideally, they get back in front and get chest to chest. This returns the advantage to the defense.
Often in this drill, that won't happen. So what's the next best thing? A strong wall up and contest from the side. Encourage your players to work on walling up (palms to the lights) and being the second player off the floor.
If they can develop those habits and that competitiveness when beat, your defense will improve as well!
Conclusion
Back attack is a simple and effective way to teach finishing. It doesn't take a lot of time. But if you commit to running this drill a few times a week, your players will get better at the rim.
Another strength of the drill is how it can be progressed. As you know, basketball is not a 1v1 game. In the next part of this drill, we will look at how to progress the drill to make it more challenging and gamelike for your players!
Related Resources
Sanderson Game-Based Training System
Next Level Finishing Moves with Jim Huber
FREE BONUS PDF
10 Small-Sided Games For Player Development
What do you think? Let us know by leaving your comments, suggestions, and questions...
|
|||||


 Facebook (145k Followers)
 YouTube (152k Subscribers)
 Twitter (33k Followers)
 Q&A Forum
 Podcasts