Basketball Lay Up Drills - 3 Lay Up Shooting Progressions

Home > Coaching > Drills > Layup & Finishing > Basketball Lay Up Drills - 3 Lay Up Shooting Progressions

The following progressions are perfect for teaching the fundamentals of finishing a lay up. They are ideal for beginner players but also work well as a refresher course for older, more advanced players.


Progression 1: 1-Step Lay Up – Footwork Emphasis

Start close to the basket with your right foot forward and left foot back. Bend your knees and get low so you are ready to explode. Take a step with your left foot, jump and shoot the lay up. Grab the rebound out of the net, return to where you began and do it again.

Right-Handed Lay Up – Right Foot Forward
Left-Handed Lay Up – Left Foot Forward

Progression 2: 1-Step Lay Up – Eyes and Hip Pocket Emphasis

It is important to teach players to locate their target with their eyes prior to finishing.

A bad habit that many players have is to sweep the ball from the outside of their body to the inside of their body during their lay up motion. This opens up the ball to the defender and makes it easier for the defender to steal.

When practicing a right handed lay up, teach your players to start with the ball on their right hip pocket and focus on keeping it on that side of their body as they go up through their shooting motion. This shields the ball from the defense.

Take a step with your left foot, jump and shoot the lay up.

These lay ups should be practiced from both sides of the basket.

On the left side, they need to keep the ball in their left hip pocket.


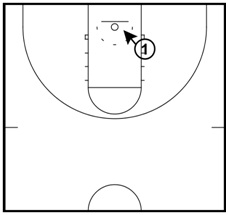
Progression 3: 1 Dribble Lay Up

The next progression is to add the dribble to the lay up. Young kids should start near the free throw line. Older, more experienced players can start from beyond the three point line.

Just like in the first progression, the player will start with their
right foot forward and their left foot back. Have them take
one dribble, and then shoot the lay up.

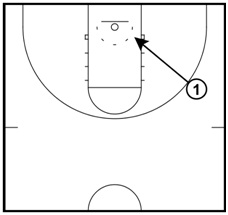
The same thing can be completed on the left side, starting with
their left foot forward.

Footwork for right-handed lay up: Left – Right – Left
Footwork for left-handed lay up: Right – Left – Right


These drills may seem simple but it is important to stick to these progressions and not try to add too much at once. With inexperienced players, adding too much at once can lead to poor retention and poor execution. These beginner lay ups will build better fundamentals which will lead to more successful lay ups and more success for you and your team.


What do you think? Let us know by leaving your comments, suggestions, and questions...


Comments

Most Likes First   Oldest First   Newest First

Ken Sartini says:
1/2/2014 at 4:00:57 PM

This is a great way to teach lay ups to younger kids Joe.

Here is something you could add to this just make it another drill.

We ran a drill called X Out, which I think is better for older kids, maybe 6-8th grade and up. Start at the free throw line, at the L. Starting from the right side, dribbling with your right hand and shooting a right handed lay yup, rebound your shot and dribble to the other side L using your right hand. Then turn, keeping your back to the middle of the floor and dribble in using your left hand for a left handed lay up.

Rebound the ball and dribble back out to the L side you started from using your left hand. Turn with your back to the middle again and dribble right handed for a right handed lay up.

This teaches the players to use the correct hand and keeps the ball to the outside away from the defender.

Like
   

Joe Haefner says:
1/2/2014 at 4:18:02 PM

Thanks, Ken! I really enjoy that drill. I call it X Lay Ups.

I like to place time restraints to see how many they can make in 30 seconds, 45 seconds, or 60 seconds.

Like
   

Nele says:
1/3/2014 at 7:23:33 AM

Nice way of teaching it. Another progression is to use only one hand while in dribble motion. This way, a reverse lay-up can also be added (starting slightly inside the 3-point line to allow for easier coverage).

Like
   

BR says:
1/3/2014 at 9:06:32 AM

Not a bad drill but have to disagree with the hide it on the hip. Kids should be taught to shoulder the ball and get it up above the hips going to the hole, to give them a chance if fouled to be able to get the shot off. So if coming from the right side then the ball gets shouldered on their right shoulder.

Then after they get the footwork and it is a reaction not a thought, you introduce a bump pad and start to teach them to scrub off the defense and create space to finish

Building this habit as they get older will allow them to finish strong at the rim and have the chance to get an and one.

Next major issue to solve is stop teaching these one-legged post moves or any one-legged moves in the paint! Go strong to the hole!

But that's another story!

Like
   

Will says:
1/3/2014 at 9:10:55 AM

Solid drill here, guys. Keep up the good work.

A simple analogy I use for teaching layups is this: Pretend there is a string attached from your right elbow to your right knee, and a string on your left elbow attached to your left knee. So if your right arm goes up for a right-side layup, your right knee must come up with it.

This analogy works well with no-dribble layup drills like the one shown above.

Will

Like
   

Joe Haefner says:
1/3/2014 at 10:54:39 AM

Thanks for the great input, guys! I like the suggestions.

BR, the reason I emphasized right hip pocket because I was trying to simulate the moment when player picks the ball up off the dribble as it tends to be around the waist to armpit area. Either way, I just want my players to keep the ball from the defense and finish. You'll notice in the video I talk about keeping the ball on the right side.

I do like the idea of getting the ball up quickly to the shoulder area. Probably a good teaching point to add.

Will, I'm glad you added that. I can't remember why I didn't mention driving the knee up... probably because we shot the video about 8 months ago. Maybe I forgot or I simply wanted to keep it simple since the progressions were for beginners.

I do say "extend up", so maybe the teaching point could have been cut as well. When I teach to "Extend" at our training sessions, I refer to driving the knee up and reaching to the basket to shoot.

On a side note, I like to layer my teaching points. You add too much too soon, they end doing ZERO of the teaching points well.

Like
   

Curt says:
1/3/2014 at 11:19:56 AM

Excellent breakdown for grade school and middle school players. We also use the "string attached to the elbow and knee" to get them to jump off the correct foot. We tell them to keep their eyes on the top corner of the box on the side of the backboard as a target. Have the ball hit that spot. It helps them keep the ball high up on the backboard and eyes up. Thanks!

Like
   

Libby says:
1/3/2014 at 1:12:06 PM

I've only been coaching a few years but have had about 8 teams that I have coached through those short years. I am assisting my son this year with the younger team he is coaching

The grades I've coached have been 2nd on through 9th grade. When you get into the higher grades you find you have a gamit of talent. But I do find when we work on lay ups I am also preaching eyes up, look at the spot on the back board. Don't know where your surroundings are if you are looking down at the ball. The ones that seem to already do this when they get to me, I make demo and have them lead the drill as so the players that are unsure can see and hopefully pick up the good. And every single player always hates going the oppisite of their strong arm.

Good drill, most likely will not try it though with the 3rd grades we are working with this year. Getting them to just shoot with one arm at the right anagle and bend the knees when they get further away from the basket seems to be where the teaching needs to be with the group we have now. Maybe as the season goes on we will be able to pull this drill out so they can advance next year when they hit 4th grade.

Like
   

BR says:
1/3/2014 at 4:29:24 PM

Joe - Ok I see your point no biggie, I should have mentioned my back ground, I played professionally for 11 yrs in Europe and have had the privilege of attending Pete Newell''s big man camp in HI and worked with Pete Carril.

For the last 8 years in the summers I work with Elite boys and girls (14yrs-24yrs old) to help build there fundamentals and re-shape their understanding of the game to help them move up to the next level.

It amazes me what some of these outstanding kids have been taught and the reasoning behind it. Another huge issue is kids are being taught to hop into there shots (who teaches this crap) and to spread there hands open so much that the thumb is in front of the ball.

I can''t preach enough how important fundamentals are so a good base is built and to en-grain in the kids heads that everything that a pro does is efficient, no wasted movement and with a purpose. That even pro''s spend the summer working on fundamental footwork. (Inside - Out & Outside - In)

Anyway I''ll get off my soap box keep up the good work!

thanks
B

Like
   

Ken Sartini says:
1/3/2014 at 4:53:53 PM

BR -

You made some good points before and what you have said here should be an eye opener for youth coaches and young kids alike.

Teach the fundamentals and success will follow/
I coached at various levels, the last being varsity boys high school.... we worked on fundamentals every day at every level.

The soap box was good, I only wish more coaches and kids could read this.

Like
   

Show More


Leave a Comment
Name
:
Email (not published)
:
Six minus zero is equal to?  (Prevents Spam)
Answer
:
 Load New Question
Comments
:
Leave this Blank
: