Stride Stop 101: The Secret Move That Transforms Your Paint Game
During Jay Wright’s tenure, Villanova was known for their ability to play off 2 feet in the paint. It was a separator for them.
But what exactly does play off 2 feet mean? It could mean a number of different things.
When it comes to playing off 2, one of your best options is the stride stop.
Unfortunately, it’s one of the more challenging footworks to teach.
While jump stops come naturally to most players, stride stops can be difficult to learn. Many players get frustrated and never master this move.
As a result, they limit themselves when they get to the paint. Make sure that’s not the case for you and your players!
What Exactly Is a Stride Stop? Unlock This Key Finishing Move
What is a stride stop? Like a jump stop, a stride stop is a 2 foot stop. Unlike a jump stop, your feet don’t hit at the same time.
Instead, your outside foot hits first.
The stride stop is useful in a couple driving situations:
-
When a help defender comes across to take a charge.
When the on ball defender is physically on the inside shoulder.
Coach Matt Lewis teaches the stride stop as a key element of The Flow Motion Offense.
3 Reasons Every Player Needs a Stride Stop in Their Bag
So what’s the big deal about the stride stop? Why not keep it simple if a jump stop will do?
Here are 3 advantages of the stride stop over the jump stop:
-
Better balance
When players jump stop at speed, they often end up falling forward. When they stride stop, the back foot acts as a brake. This allows them to maintain your balance, buying time to make a good decision.
-
Better protection
Players who jump stop tend to do so either facing the rim, or, at best, with their shoulders square to the baseline. This exposes the ball and increases the likelihood of a blocked shot.
When players stride stop, their inside shoulder is pointed at the rim. The shields the ball from the defender, decreasing the chances of a turnover or blocked shot.
-
More options
Players who jump stop usually only see what’s in front of them and to their sides. It’s not natural to pivot from a jump stop at the rim to face behind you.
Players who stride stop can more easily do this. They are in a position to naturally front pivot on their back foot, allowing them to see what’s in their taillights. This area is often open on penetration, allowing them to create inside-out 3’s.
3 Coaching Points For Stride Stop Success
-
Point your inside shoulder at the rim
We mentioned this above. Pointing the inside shoulder at the rim protects the ball. It also puts players in great position to pivot.
-
Have your feet wider than your hips
Having wide feet does 2 things. First, it creates space from the defense. The wider players’ feet are (while still being in an athletic position), the further away the defender is.
Secondly, it helps with balance. This prevents charges against help defenders.
-
Put the ball on your chin
Likewise, there are 2 benefits to players putting the ball on their chin. First, they are in a position of strength. It’s not down at their waist where it’s easily knocked away.
Second, players can quickly shoot from the position. The quicker they are able to shoot, the less likely the defense is to impact the shot.
Fixing the 1-2 Issue: Simple Footwork Tips for Perfecting the Stride Stop
In my experience, the biggest challenge of teaching the stride stop is the footwork. Many players struggle with the 1-2 stop. They end up jump stopping, with both feet landing simultaneously.
To help with that, remind them of the word “stride.” Striding suggests running, not jumping.
Instead of jumping and landing 1-2, tell them to run and stop on the outside foot first. To practice this, you could have players run down the floor in a zig-zag fashion (with or without a ball), always stopping on the outside foot first.
You could even have them pause on the outside foot (stand on 1 foot) for a :02 count before putting their inside foot down.
I’ve found that to be helpful in getting players feet correct.
A Finishing Drill To Master The Stride Stop
2 Foot Finishing 1v1
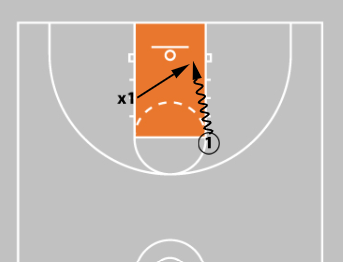
The offense starts on the elbow. Defense starts halfway up the opposite lane line.
Players can initiate the rep in numerous ways. You could say “go.” You could have the offense dribble in place and then use a pushout dribble to start the rep. You could have the defense pass to the offense who rips to the outside and attacks.
The offense player attacks the rim. The placement of the defender means they should end up on the side of the offensive player, cueing a stride stop.
The offensive player must stride stop and attempt to score. The video clip above shows a number of scoring options using a stride stop (back pivot, Rondo, up & under). The defense attempts to stop the offense from scoring.
During initial teaching, you may want to constrain the defense by having them hold a basketball or limiting them to 1 jump.
From Wild to Controlled: The Power of the Stride Stop Finish
Once your players learn the stride stop, they’ll love it. It will help them score more, pass better, and commit fewer turnovers and fouls.
Teach it and drill it and you’ll love the “strides” your players and team make!
Learn more about Matt Lewis Finishing School & The Flow Motion Offense!
|
|||||


 Facebook (145k Followers)
 YouTube (152k Subscribers)
 Twitter (33k Followers)
 Q&A Forum
 Podcasts