Four Corner Passing Drill
The following drill not only works your players’ conditioning and passing skills but it also works your team’s brain by making your players think on their feet. The four corner passing drill, diagramed below, should be run at half speed to begin with, eventually getting into full speed as your players become accustomed to the positions and rotations.
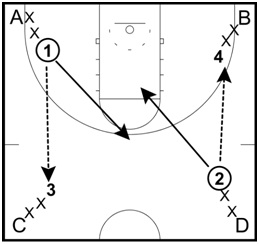
Step 1:
The drill begins with players lining up in four lines (A, B, C & D), one at each corner of the half court. The players in lines A and D begin with the basketball (as represented by player # 1 and #2 to the right).
The first player in line A makes a strong chest pass to the first player in line C. After making the pass to line C, line A immediately cuts across the court to the corner where line D is set up.
In the same design, the first player in line D makes a strong chest pass to the first player in line B. After making the pass to line B, line D immediately cuts across the court to the corner where line A is set up.
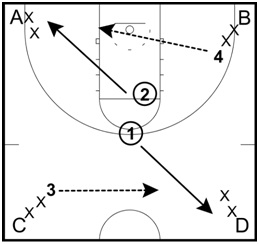
Step 2:
Line C catches the first pass from line A and then makes a return pass to the player from line A who is cutting across the court. Player #1 from line A receives the return pass over their right shoulder as they finish their cut.
At the same time, line B catches the first pass from line D and then makes a return pass to player 2 from line D who is cutting across the court. The first player from line D receives the return pass over their right shoulder as they finish their cut.

Step 3:
The first step of the drill is complete when player 1 from line A and player 2 from line D receive their return passes from line C and line D, respectively. Once they receive the return pass, they should now be on the opposite corner of the court from where they started. For example, player one from line A is now at the end of line D and player two from line D is now at the end of line A. They will hand the ball off to the player in the front of that line.
In order for each player to get a turn as a passer and
receiver, each player will rotate counter clockwise
once they finish step 2. So instead of staying at the
end of line D, player #1 from line A rotates up to
get in the back of line B. The diagram on the right
shows the rotation.
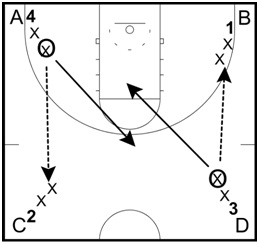
Step 4:
The drill then restarts from the beginning and repeats the same steps from above. The player that is now in the front of line A passes to the player in front of line C. And the player that is now in front of line D passes to the player in front of line B. This is shown in the diagram to the right.
This drill works great in practice as well as during pre-game warm ups.
If you'd like to see this drill in action, here's a youtube video I found of a youth or middle school team running the drill.
FREE BONUS PDF
72 Winning Basketball Drills eBook
What do you think? Let us know by leaving your comments, suggestions, and questions...
|
|||||||||


 Facebook (145k Followers)
 YouTube (152k Subscribers)
 Twitter (33k Followers)
 Q&A Forum
 Podcasts