3 Competitive Basketball Shooting Drills
These shooting drills are a great way to improve your shooting, develop rhythm, build confidence, and get up a high amount of reps in a short amount of time. Not to mention, they are a fun and challenging way to get better.
These are great to use in the beginning of your workout or at the end of the workout when you are more fatigued.

Competitive Shooting Drill #1 – 57 Shooting
Before beginning this drill, you can spread out cones all around the arc (as shown in the diagram to the right).
Younger players should start close to the basket and advanced players can start further out from the basket.
Begin Shooting from spot one on the right side of the basket. This is marked with a #1 in the diagram.
While shooting, it works best to have a partner who can rebound and pass you the ball.
If you make five out of seven shots from spot #1, you can advance to the next spot. You will continue all the way around the court, only advancing if you make five out of seven shots.
If you miss three or more shots from any spot, you must start over from that same spot.
Competitive Shooting Drill #2 – “7”
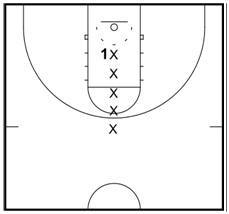
For this drill, the shooter should start just a few feet away (5 to 10 feet) from the basket. This is marked with a #1 on the diagram to the right.
You will shoot ten shots from that same spot. If you make at least seven out of ten, you can take a step back. You can adjust the step back based on the skill level. 2 to 5 feet will work for most players.
If you make less than seven, you get an “out.” You are only allowed 2 “outs” in the drill before the drill is over.
This is a great progressive drill for measuring and determining your shooting range. Wherever you get 2 outs is your current shooting range. This keeps you within your shooting range while also giving you a goal to shoot for to see how you can extend your range.

Competitive Shooting Drill #3 – 1-2 Shooting
For this drill you will be working against the clock. You can start with setting a one minute timer, but you can adjust the time.
Every time you make a shot, you get one point.
Every time you swish a shot or the ball hits the back of the rim and goes straight down through the hoop, you get two points.
You will need a rebounder.
The shooter should take shots from different spots all over the court.
Shooting Drill Tips
Use the proper regressions and progressions: Adjust the goals and distance you are shooting from the basket based on your shooting level.
Emphasize proper shooting technique: For example, if you need a quicker release, work on sticking your feet before receiving the ball.
To get FREE 5 Shooting Drills To Make More 3's, click the banner below
What do you think? Let us know by leaving your comments, suggestions, and questions...
|
|||||||||||||||


 Facebook (145k Followers)
 YouTube (152k Subscribers)
 Twitter (33k Followers)
 Q&A Forum
 Podcasts