Basic 'See the Court' Drill
Introduction
Spacing is one of the hardest concepts to coach! Players often end up bunched together, allowing one defender to guard two offensive players.
This "See The Floor" drill helps teach players basic spacing principles while also working with players on driving with their head up.
An Organized Penetration Reaction System
When 1 player drives, what do the other 4 do? If you don't have a plan for this, they usually do nothing.
The problem with that is that it allows x2 to both help on 1's drive and get back to 2.
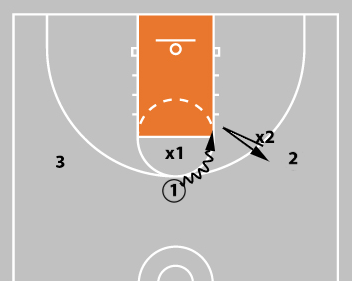
That's where the "Push-Pull" penetration reaction comes in. It means, if the ball is driven at you, it pushes you away. If it's driven away from you, it pulls you the same way.
Now, when 1 drives, 2 moves to the corner. This makes 2x make a decision. If x2 doesn't help on 1's drive, 1 gets all the way to the rim.
If x2 does help (as shown), they can't recover to 2 before 2 has an open shot.
Teach that to your players as your build out this drills
To get FREE 72 Winning Basketball Drills eBook, click the banner below
Instructions
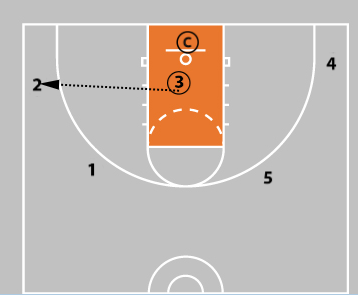
- Position five players spaced out evenly around the three-point line. A coach with a ball stands near the baseline on one side of the backboard.
- The driver then passes to any of the players on the three-point line.
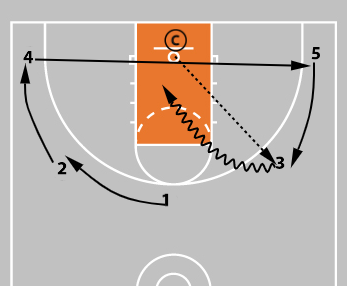
The drill begins with the coach passing to any of the players on the three-point line. Whoever catches it immediately drives toward the hoop as if for a lay-in.
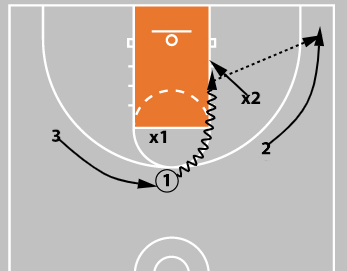
Teammates react by using basic "push-pull" principles. Notice that for player 4, they are pushed to a cut along the baseline. This is often open as their defender loses vision of them.
If your players are pushing and pulling correctly, you'll always end up 4 around 1 on a drive. You should have 2 players in the corners and 2 in the slot area.
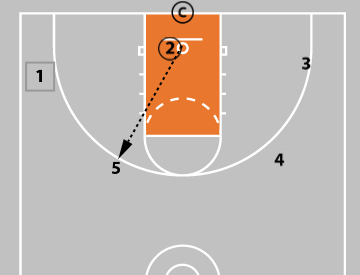
Here, 3 passes to 2.
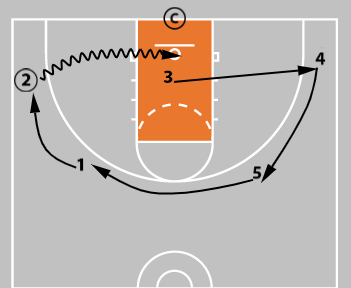
Next, the player who caught the ball (Player 2) drives to the basket.
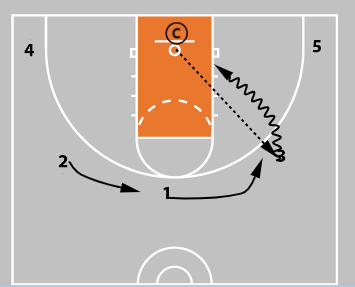
Teammates "push" or "pull." 3, who is still inside, follows the same rules. Here, they are pushed to the opposite corner.
2 passes to a perimeter player. This action continues until the coach yells "Shot" to signal the driver to continue in for a lay-in instead of passing.
If two players go the same area, you should stop the drill and point out to the players that they are bunching together and violated their push/pull principles.
On every catch, the players need to jump to the ball and catch in a triple threat position.
By jumping to the ball, it teaches them to beat the defender to the ball. By getting in a triple threat position as quick as possible, it teaches them to be ready to shoot or drive if they see an opportunity to dribble penetrate. As a result, you have less turnovers from fewer stolen passes and more points from being ready to attack.
Progressions:
- Pass until the coach yells, "shot."
- Tell the players to pass the ball a certain number of times and take a shot. This progression would be continuous WITHOUT the coach yelling, "shot." For example, pass the ball 3 times, and then take a shot. If you want to ensure that everybody takes a shot, you could say that each player needs to take a shot before one player takes a second shot.
- Coach sets a time parameter as well. For example, see how many lay ups they can make in 2 minutes. They can shoot a lay up after 4 passes. Each player has to take a shot before any player can take their second shot. Each player must take their second shot before any player takes their third shot and so on.
- Instead of shooting layups, shoot jump shots.
- Some coaches don't like consecutive drives. In that scenario, you could have a player drive and kick. The player who receives the kickout would throw a "1 more" pass to another person on the perimeter who would then drive again.
Alternate hands on every other drive. First time, drive to the right with the right hand. Second time, drive left with the left hand or vice-versa.
Points of Emphasis:
- Players at the three-point arc need to be at least ten feet away from other players.
- Catch the ball in triple threat.
- Jump to the ball.
- Be ready to move.
- There is one exception to push pull. If a player drives outside/baseline from the wing, the player in the same side corner holds the corner. This prevents them from running into the driver and gives the driver a natural kickout option. The player in the opposite corner holds the corner as well.
- Praise players for making passes that show great court vision. Encourage them to make game-like passes (skip passes above the head, for example).
Good Spacing = Good Offense
Just by teaching spacing, your offense will get significantly better. You'll make the defense guard the whole court and you'll have players in positions to attack or shoot.
Use this drill as a starting point for your team. It's great for teams of all ages!
To get FREE 72 Winning Basketball Drills eBook, click the banner below
|
|||||||||||||||||||||||||||


 Facebook (145k Followers)
 YouTube (152k Subscribers)
 Twitter (33k Followers)
 Q&A Forum
 Podcasts