This is my first official week of basketball practices — this week I have practices with 4th grade boys, 6th grade girls, and high school varsity boys…
That’s a wide range of ages! Yet I teach them all our transition offense the exact same way. I start teaching our 4th graders the same way I teach high school players. And they all run the same transition offense.
In fact, I worked with our 4th graders on Monday, 6th graders on Wednesday, and varsity players on Friday — and they picked up the transition really quickly. It’s going really good so far!
Here’s How We Teach Transition Offense at the Beginning of the Season
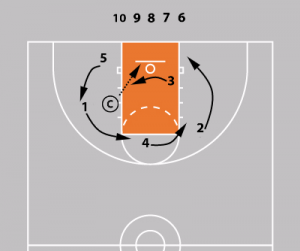 We use the 2 Trips Drill to teach positions, spacing, and the basic components of our transition.
When first running the drill, we always have players pass ahead to a wing (could be either wing) and then the wing passes to the rim runner for a lay up.
MANY excellent teaching opportunities came from this simple drill!
Here are the steps we took to teach transition offense with our youth teams:
- Have 5 players get in the lane area. Other 5 players stand under the basket listening. (Keep in mind all the players already know what “transition offense” means.) I toss the ball to a player and say “You just got a defensive rebound and it’s time to run your transition offense. What is the goal when running transition offense?”
- A few players respond. The answer comes out… “We want to beat the other team down the court and get a lay up. That is the goal.” And then I ask… “How do we do that?”
- Again players respond with a variety of answers. I/we lead them to the correct answers… “We need to sprint! Turn our heads and look for the ball. And we need great spacing.”
- I ask… “How do we keep great spacing?” The answer is…. “We fill positions and keep great spacing going down the court.”.
- Next I go through each position and explain what the wings, rim runner, PG, and trailer do.
- Finally, we run the 2 Trips Drill and teach.
At the beginning of the season, we yell freeze and do a good amount of teaching so players learn the basic offense concepts. In every case with youth players, many great teaching opportunities come from this drill.
Youth Player Positions – Closest Player Fills
Since I don’t want to pigeonhole our young players, and I want our kids playing and learning all positions, we do not assign players to certain positions. Instead, when we get possession of the ball, whoever is closest to each position fills that role.
Varsity Player Positions – Assigned
For the high school varsity team, players are assigned positions:
- Point guard (1)
- Wings (2 and 3)
- Inbounder/trailer (4)
- Rim runner (5)
Nothing Special and Next Steps
The 2 trips drill is nothing special. It’s just a 5v0 drill where you quickly and efficiently have player run 2 trips up and down the court. But often times I find the simple drills are the best for efficiently teaching players.
We usually only run this drill the first week or two of the season. Then all our transition drills include defenders… whether we’re playing 1v1 attack, small sided games, advantage games, or 5v5 scrimmage.
If you want more transition offense resources, I highly recommend Don Kelbick’s 4 Second Fast Break. I really like his philosophy in regards to attacking in transition. Plus lots of good drills, tactics, and mental aspects of scoring in transition offense.
If you have any questions, let me know.
I run a similar drill that we call 11-man (so-called because of the number of players required to run it). It is a super fast-paced 3 on 2 fast break drill that in my experience players of all ages LOVE and it gets in great conditioning work.
Here’s the setup: 3 players in the paint under one basket, 2 players on defense at the other end. 4 “lines” (rarely more than 2 in a line) at each sideline on each side at foul line extended. You need 2 in each ft extended line on the same side as the basket with 3 in the paint.
Coach throws up a shot and the 3 in the paint compete for a rebound. First player in each line steps onto court yelling “Outlet!”. Rebounder passes out to one side and follows his pass to fill the lane on fast break. Other sideline fills the other line. The person that received the outlet dribbles near middle of floor on fast break. The two defenders already back are trying to stop the offense from scoring so it’s a 3 on 2 drill. With good offensive decision-making, this drill should always result in a good shot opportunity in 2 passes or less. No matter what, this is a one-shot drill and whoever gets the rebound or gets the ball out of the basket passes to an outlet and goes down court filling the lane. The opposite outlet just fills the side they are on as the outlet receiver dribbles to space towards the middle of the floor. There should be 4 players left so 2 stay on defense and the other 2 go one each to the outlet lines.
To make this work properly, there must always be at least 7 players on the ball end of the floor (an outlet on each side, 2 defenders, 3 offensive players) AND at least 4 players on the opposite end (two defenders and two outlets). If you have only 11 players, no one waits for more than one trip. Even with as many as 15, every player gets lots of repetitions in a lot of different spots. The one thing this drill doesn’t do is create a “trailer” that can follow up a missed shot. If you have at least 13, you could work it out to have a trailer each time.
I have been coaching my son’s 5th grade basketball team this season. I have 6 years coaching experience with youth girls, but his is my first year with the boys. I have a similar offense as our core offense. We keep loosing games (even after having a lead most of the game) because they stop using it. I have called time – outs and drawn up reminders on clip, but every game we loose in the last quarter to bomb shots and unsuccessful drives o he basket.